Replacing Motor Mounts
Mercedes-Benz Type 180D Ponton
Sedan
Austin Cooper / Sacramento, California / 1958 Mercedes-Benz Type W120 180D
Related page: Replacing
Mercedes-Benz Ponton Motor Mounts
Introduction
Let me begin by saying that this took a lot longer than expected! My inability to
figure out why I couldn't get one of the motor mounts on began with installing
one of the mounts on the wrong side. Many people say that both mounts are the same,
which is true for the Type W121 190 sedans (gas engines), but let me assure you,
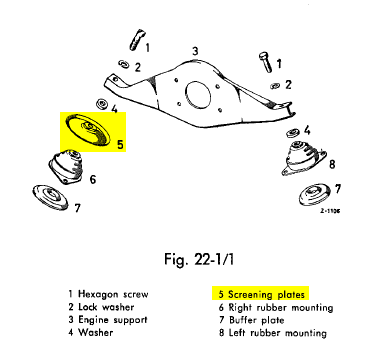
for the Type W120 180D they aren't (see
Job № 22—0 Front Engine Suspension,
which describes and illustrates the differences for the Type 180D). This page chronicles my five-hour struggle with these mounts.
- Obtain a jack, and get two long bricks, or two 2x4 pieces of wood,
and place them between the jack and the oil pan to distribute the
weight evenly.
- Use the emergency brake, put the transmission in gear, or place a
wheel chock behind one of the rear wheels to prevent unintentional
rolling.
- I don't remember the wrench and socket sizes, but make sure you
have shallow sockets, an angle attachment, and let's say approximately 18" of extensions.

- Use both short and long wrenches for the job.
- Driver side (left) rubber mount / M-B part № 180 223 02
12
- Passenger side (right) rubber mount / M-B part № 180 223 03 12
Step-by-Step Guide (My Experience)
- Loosen the long bolt that holds the engine to the mount all the way
out.
- Notice the
plate on the passenger side of the engine (Type
180D/180Db only). Lift the engine just enough to remove the plate, and then lower the engine.
The plate covers and protects the mount from diesel oil that may
leak from the fuel main filter or the injection pump. The mounts may be the same or different for the gas
engine models, but for the diesel engine, the mounts are not exactly
the same due to that plate, which needs to be on the passenger side mount to protect it.
- Spray some rust penetrant on the two bolts on either side that hold the
mounts to the front axle support.
- Loosen the bolts on either side, and if you feel a lot of resistance
when the bolt starts turning, spray some rust penetrant into the bolt, and
screw it in and out until it feels a lot easier! You definitely NO NOT want
to break these.
- Once all four bolts are out, lift the engine about ½ - ¾ of an inch, and remove the mounts.
- Obtain the new mounts (see Tools / Parts / Techniques) and get that plate that goes over the mount on the passenger side.
This is what I didn't do, and I wasted approximately four hours trying to figure out why it
wasn't working. Make sure that plate fits over and sits on that one mount, and install that one first.
I was sure that I put the mounts in the correct way once I realized
they were on the wrong side. The only difference between the mounts was
the top metal rounded rectangular piece, which is bigger on the driver
side and smaller on the passenger side (for the plate to fit on top of
the mount).
- I did it the hard way, but in retrospect, it seemed straightforward. At
the time, I got frustrated that I couldn't line up the long bolts into the
top of the mount when the engine sat on the mount. So what I did was first
screw in the long bolt into the mount, and let the engine down a
little bit so I could start the thread on the two screws on the mount. I
DID NOT LOWER THE ENGINE ENTIRELY.
- After that, I did the same thing on the driver side mount (long
bolt first) DO NOT FORGET ABOUT THE THICK WASHER.
- Now is the fun part.
You need to have patience and a good hand.
- Now move the engine around with the jack, or by rocking the engine to align the
last two bolts to get the mount into the frame. For this I
got one bolt in, and had to move the engine around with the jack to get the
other bolt lined up and in. It took some time to get it all aligned, but
eventually I got it. I also used a flat head screwdriver to help guide the
mount.
- Once I got the bolts into their home (Happy Gilmore pun intended) I
got the three bolts on the driver side all good and tight.
- On the passenger side, I wish I had a ratcheting type of flat wrench,
but I still made it work without one. Firstly, I tightened the bolt closest
to the radiator by getting the wrench through the bottom crevice of the radiator
and the front panel of the car. It took about seven minutes to tighten that
one.
- For the other bolt, just let me tell you to prepare yourself to get
your arm dirty. Oh, and also having two people makes this WAYYYYYY easier.
Get your hand between the frame and oil pan, and get the wrench onto that
bolt. That one took me seven minutes to complete as well, but hey, I was
done when she was good and tight!
- Almost forgot – be sure to use
the spring type washers on the little bolts for the mounts. Place
them between the head of the bolt and the top metal part of the mount.
- VERIFY ALL BOLTS ARE TIGHT, AND WONT DANCE AROUND, AND
MAGICALLY DISAPPEAR!
Selected Photos
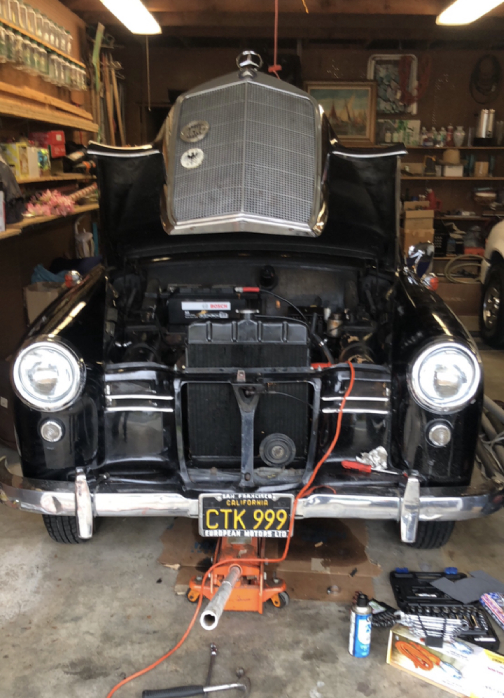
Figure 1.
The patient – 1958 Mercedes-Benz Type 180D Ponton sedan
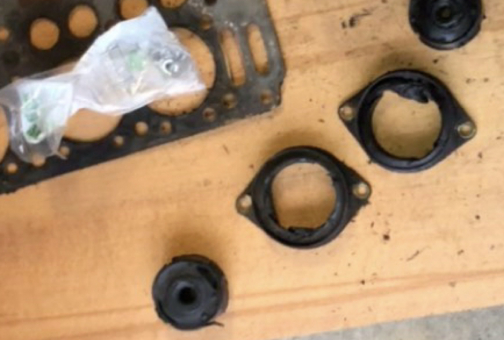
Figure 2. Original Motor Mounts
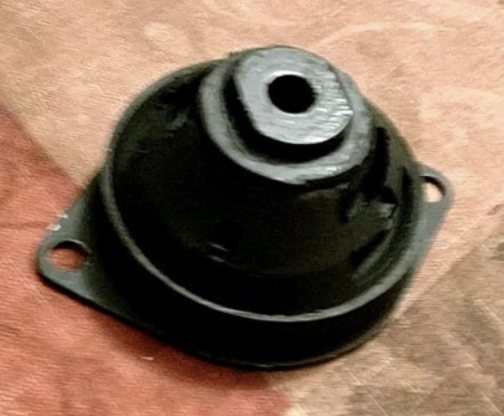
Figure 3. New Motor Mount
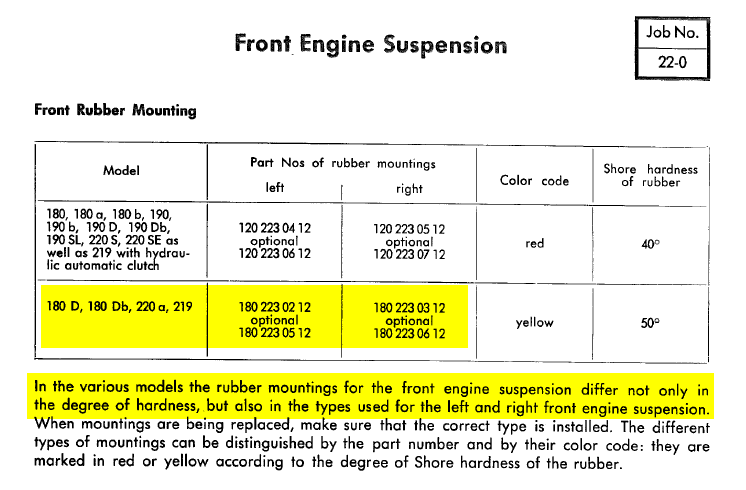
Figure 4. Excerpt from
Job № 22—0
/ Source: Service Manual Models 180 to 220SE (SM-1201-000)
Created: February 4, 2020 / Jeff Miller
Last Update:
February 08, 2020
© www.mbzponton.org
Return
to the Ponton Workshop page
Return to the Mercedes Ponton page