Replacing Flexible Disc on Steering Column of a
Mercedes-Benz Ponton
Robert Hall / Placerville, California / 1959 Mercedes-Benz Type 219 Ponton sedan
Overview
While doing an engine overhaul, I realized how rotten, oily and swollen the flexible disc on the steering shaft was. I was dismayed to see that Mercedes listed the part for $84. While walking through the local auto store, a similar part by Dorman Co. caught my eye. It covered several applications including Ford, Chrysler and GM. It seemed to be a universal part.
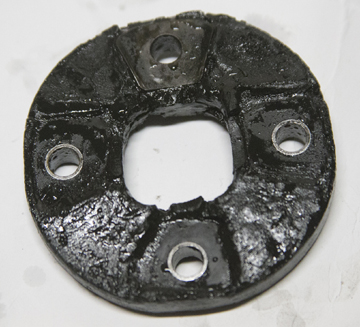
Photo 1. Original part
Illustration 1. Original part number 183 462 00 46 "Joint disc"
For about $10, the part was a near perfect replacement. The punched holes were aligned perfectly, and the OEM spacer tubes were also an exact fit. The disc was about ¼" larger diameter, so it sat closer to the oil dip stick, but there was no fit problem at all on my 1959 Type 219 Ponton sedan.

Photo 2. Dorman part compared to the original
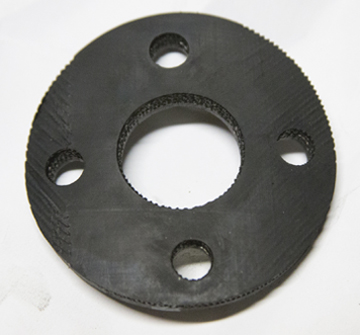
Photo 3. Detail of the Dorman part
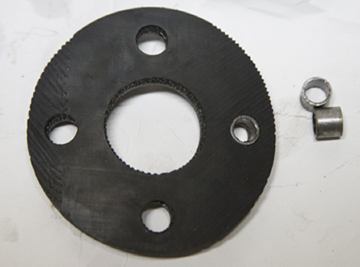
Photo 4. Dorman replacement disc with original spacer tubes – saved from original disk
General Steps to Replace the Disc
1) Disconnect the horn wires that exit the steering gear box from the terminal block on the left fender wall, under the heater ducting. Mark or note wire color/terminal match-up. If these wires have degraded after years of exposure to heat and oil, now is the time to replace, from the horn button down.
2) Tape the wires together for easier pulling, and tie a long piece of twine to the free end of the horn wires.
3) Unbolt the four sets of nuts & bolts holding the crescent shaped plates to top and bottom of coupling disc located above the steering box. Note the location and orientation of the grounding strap and the direction the bolts and nuts are pressed from. The steering column will now be "free" with the horn wires still running through.
4) Remove the center horn button by carefully prying the metal support pan at top and bottom. I used a very slim clay modeling spatula to get under the metal.
Note: The factory Service Manual also provides another method. For details, follow Job 46-2 (steps 1-4).4a) Remove the cotter pin and castle nut, the springs, cup and seal. Remove the horn ring. Unscrew the three screws holding the horn mounting plate in place. The horn wires can now be pulled from inside the car.
5) If the wires are being replaced, pull until you have your twine inside the car. If the wires are to be reused, you only need to pull until you have the wires up into the steering column.
6) Cut the twine at the flex disc, being sure to have plenty of slack on either side of the disc. Remove the old disc. You must clean and reuse the hardware and the spacer tubes. You will toss out the hardware that comes with the Dorman brand disc.
7) Thread the twine through the new disc and tie the ends together. Pull the horn wires back through the center of new disc with the cleaned-up spacers installed in the four bolt holes.
8) Replace all horn button springs, cup, seal and trim.
9) Replace the plates, ground strap and hardware. Reconnect wires to terminal block.
Created: June 14, 2016 / Jeff Miller
Last Update:
June 14, 2016
© www.mbzponton.org
Return to the Ponton Workshop page