Douglas P. Broome / douglas.broome@verizon.net / McLean, Virginia USA
Introduction
The clutch in my 1959 Type 220S cabriolet was slipping badly, especially under load. I heard or felt no other symptoms like noise or grinding of gears. I decided that a new clutch was in order. Never having done a clutch job before, I contemplated the enterprise with trepidation. I read the service manuals, which are straightforward in the clutch and transmission sections. I also consulted the articles written by Ponton owners:
- www.mbzponton.org/valueadded/maintenance/clutch/clutch_adjust.htm
- www.mbzponton.org/valueadded/maintenance/clutch/clutch_replace.htm
- www.mbzponton.org/valueadded/maintenance/clutch/clutch_replace2.htm
After finishing the job, I felt an article coming on, susceptible that I be to periodic bouts of authoritis. There is but one cure. Read on. My write-up will not repeat material in the above pieces, but will serve as a supplement providing additional information. Note that the Hydrak clutch is not discussed. Also note that it does not address the differences in the mechanical clutch for the 220SE Ponton, particularly with respect to the driven disk, the pressure plate, and the release bearing and sleeve.
Appearance
After disassembling the clutch, I found that the clutch disk was worn into the rivets on the pressure plate side. The pressure plate was scored. Sometimes pressure plates can be resurfaced, but I opted to get a new one anyway. Some friction material remained on the flywheel side of the disk.
Pilot Bearing (a.k.a. [1] clutch spigot bearing)
The small pilot bearing fits inside the end of the crankshaft. The original pilot bearings were open on both sides and packed with grease. The grease on mine had caked, and the bearing turned roughly and noisily.
There is a small metal cover that must be pried out. In doing so the cover may become bent at its hole. Lightly hammer it back flat. Normally a pilot bearing removal tool is used to extract the bearing. I borrowed one.
Always replace the pilot bearing. It is cheap: Mercedes list price $33.00, part number 115-980-01-15. The pilot bearing is an industry standard [1a] bearing number 6202. [2] I bought an SKF 6202 (DIN 625) bearing from my local bearing supplier. Cost: $5.50. Under this industry number one can get an open or sealed bearing. I chose to get a sealed one. Now I need not concern myself that the bearing will become dry or that I greased it incorrectly. It fit perfectly. Tap it in with a socket after lightly oiling the outside and the receptacle cavity.
Flex Disk (a.k.a. shaft plate and "guibo")
The flex disk is the hexagonal rubber item between the transmission and the propeller shaft. Because it must be removed to lower the transmission, I decided to replace it even though it did not appear seriously degraded. Mercedes part number 180-411-06-15; list price $99.00. These are the same on all Pontons since mid-1956. [3] They are available through aftermarket suppliers for much cheaper than the Mercedes price. I paid $53.00 for one manufactured by Jurid, the manufacturer of the ones sold by Mercedes. [4]
If not damaged, the six bolts and nine washers can be reused. Originally they were locked by castle nuts and cotter pins although sometime nylok stop nuts are present as previous replacements. The castle nuts are available from Mercedes: list $6.75, part number 183-990-00-55. Places that supply metric nuts and bolts can order them. Size M12, 1.5 pitch.
Before removing these bolts, washers, and nuts, note carefully how they are fitted. Make a diagram. Look carefully at the 190 service manual figures 41- 1/5 and 41-4/1. Note that the three slightly longer bolts (with a knurl on the head) connect the flange on the transmission side with the flex disk. The nuts face the transmission.
The three slightly shorter bolts (conventional hex head) have two washers each. These washers abut both sides of the flex disk. See items 11 in figures 41-1/5 and 41-4/3. Again, the nuts face the transmission.
Finally, be sure to note the correct orientation of the flex disk as shown in the 190 service manual at figure 41-1/4a. The side with the lips/eyebrows over the holes faces the transmission, and those holes fasten to the transmission flange. The long bolts go through the flex disk holes with the lips and fasten the flange on the transmission side.
Release Bearing and Bearing Carrier
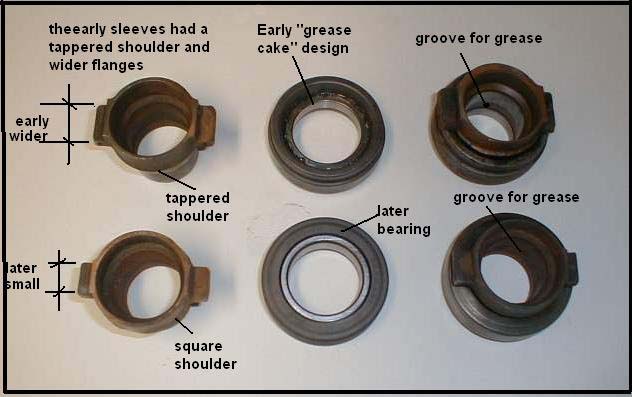
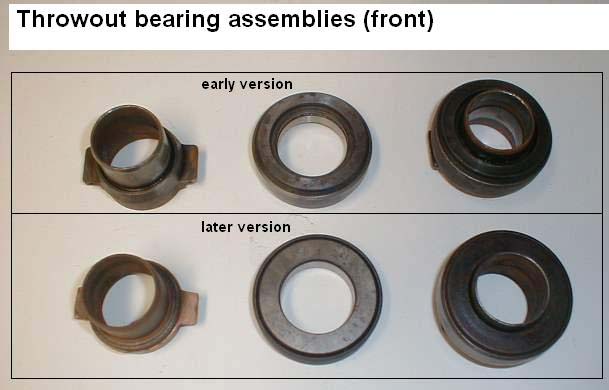
This topic was more troublesome to sort out than I expected, but it led to interesting discoveries. For this reason I have laid out what I have learned in considerable detail so the information can be preserved. Some aspects may seem historical and anachronistic, but there is significant potential for confusion when looking for the correct bearing. I have divided this section into discussions of the release bearing itself and the sleeve on which the bearing is carried. Refer to the following photos [5] when reading this section:
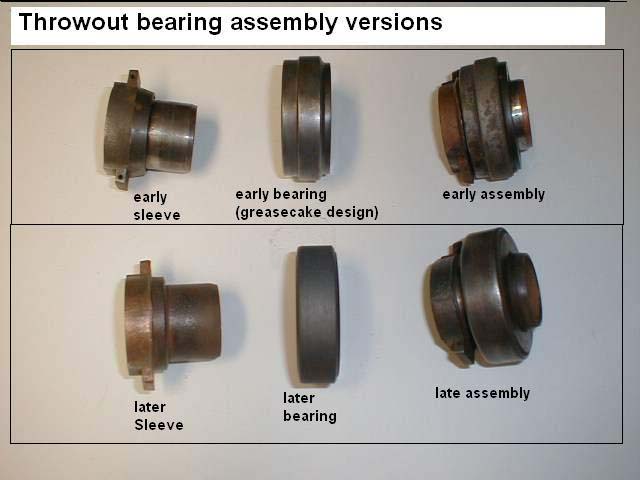
(A) Bearing Sleeve/Carrier/Body [6]
Apparently Mercedes has never supplied the sleeve as a separate item with a unique part number. If someone needed a new sleeve from Mercedes, the only option was, and is, to buy the sleeve in combination with the bearing. The original part number for this combo was 121-250-01-15. It included the "old type" sleeve and the "old type" release bearing. That combo is no longer available from Mercedes. What that means is that Mercedes no longer supplies the "old type" sleeve. As discussed below, if an "old type" sleeve is present and in reusable condition, the release bearing appropriate to it is available from Mercedes and, quite limited, in the SKF and FAG bearing vendor aftermarket.
If the sleeve is undamaged, it can be reused. Some people, however, prefer to replace the bearing and sleeve with new ones, to be on the safe side. The "new" bearing-and-sleeve combo Mercedes currently supplies is part number 110-250-00- 15; list price $170.00. This part number supersedes the original 121-250-01-15 number for the "old" combo that is no longer supplied.
At some point after the Ponton era Mercedes changed to supplying only the "new type" sleeve. That sleeve requires the "new type" release bearing. If a new sleeve is required, the "new type" is what you will get from Mercedes, but only as part of the "new" combo.
The inside of the sleeve has a small depression. Dab some grease there to keep the sleeve from binding when sliding over the shaft during operation. At the same time lightly grease the splines on the input shaft of the transmission.
(B) Release Bearing (a.k.a. throwout bearing and clutch withdrawal bearing)
Once the transmission is out, the release-bearing-and-sleeve combo is easily removed. Note carefully which side of the old bearing faces the ears of the sleeve. The bearings can be positioned on the sleeve either way, but only one way is correct. The bearing I removed and its new replacement had serrations around the outside edge of the bearing on the side facing away from the sleeve ears. Also the serrated side is the more beveled outer perimeter of the bearing.
I elected to reuse the sleeve as it was undamaged. To remove the old bearing I used a Dremel-type tool with a cutoff wheel. With care, patience, and a steady hand this works fine. Alert: Wear eye protection!
The new release bearing is a press fit onto the sleeve. I put the sleeve in the freezer and heated the new bearing in an electric skillet to maybe 300 degrees (F). When I was ready to assemble the two, I squirted some WD-40 on the sleeve and verified, yet again, the correct orientation of the bearing. Then it slipped right on.
(B.1) New Bearing - M-B part 000-981-43-25
Mercedes lists $85.00 for the "new type" bearing alone; part number 000-981-43- 25. Note this is a sealed ball bearing. The one I bought in a Mercedes box was made by SKF and carried the SKF number 360540. This is not an industry standard bearing, so it is not available generically. Its published dimensions (in millimeters) are:
40.0 inside diameter
69.6 outside diameter
20.5 widthSKF still lists this number as valid. Apparently SKF produces it in batches on demand. Existing stock can be found outside of Mercedes channels. When I was looking for this SKF bearing before I did the work, I received quotes ranging from $65.00 to $135.00 plus shipping. Researching this article, however, has led me to a private American source of these bearings for nearly $50.00 plus shipping. Would that I had done my homework better!
As to equivalents, FAG 526814 B was a direct equivalent to SKF360540. The dimensions are identical, and it appears on the SKF cross-reference list. Apparently this FAG number remains good but only as original equipment, according to FAG. I may have found a private source for this bearing at nearly $50.00. FAG technical data lists this bearing as equivalent to Mercedes bearings as follows: [7]
981-143-25-?? [8]
001-981-52-25 [9]
504-620-90-04 [10]
110-250-00-15 [11](B.2) Old Bearing - M-B part 121-254-00-10
Mercedes still supplies the "old type" release bearing: part number 121-254-00-10; list $147.00. I cannot testify as to its SKF number as I have not personally seen this bearing. I suspect it is the SKF 306654 B that Håkan Johansson found (see following), but I am not certain.
One member of the International Ponton Owners Group (IPOG), Håkan Johansson, reports that he removed a release bearing from his 219 with SKF number 306654 B on it. SKF reports that this bearing is obsolete and discontinued. The dimensions (in millimeters) of SKF 306654 B are:
40.0 inside diameter
69.0 outside diameter
21.0 widthI may have unearthed some of these bearings from a private source also. The price may be nearly $50.00 plus shipping.
I came across reference to another discontinued FAG bearing, FAG 501929 C. Its dimensions (in millimeters) are:
40.0 inside diameter
69.2 outside diameter
21.5 widthFAG technical data cross reference this bearing to SKF 306654 B. I found a small stock of this FAG 501929 C bearing in the USA from a private source and from Werner Karasch in Germany but nowhere else. [12]
One more relevant FAG bearing came to light: FAG 505310 C. It was identified as being for the "early type" Ponton release bearing. I was unable to obtain any dimensions as it is totally obsolete. I cannot compare and contrast it with the other FAG bearing, FAG 501929 C, indicated above as being suitable as the "early type" release bearing.
(B.3) Other Manufacturers
I came across no indication of manufacturers other than SKF or FAG ever making the release bearing for Pontons. This research effort led me to speculate that SKF and FAG made the above release bearings only for selected Mercedes and Fiat applications.
(C) Conclusion
The mention by Joe Alexander, a member of the International Ponton Owners Group (IPOG), of an "early" and "late" release bearing is now clarified. Clearly the "early" type was SKF 306654 B and FAG equivalent, and the "late" type was SKF 360540 and FAG equivalent. Different sleeves were used "early" vis--vis is "late." They must not be interchanged. What this means is that if you locate a new "early-type" bearing, SKF 306654 B or FAG equivalent, you must reuse your "early type" sleeve or find another identical sleeve. Otherwise you must obtain a "late type" sleeve and an SKF 360540 or equivalent FAG bearing. Early-type sleeves cannot be mixed with late-type sleeves and vice versa. I do not know when "early" changed to "late" with respect to any of the Ponton models, but I have come to believe it happened after the end of the Ponton era. [13]
Note: An internet search easily turns up both the old and new release bearings.
Confused? I certainly was until I came to realize that the sleeve was never supplied separately and never had its own part number. Now consider yourself informed about that as well as the different bearings.
Driven Disk
The 200-mm clutch disk is now Mercedes part number 010-250-12-03 for all Pontons that use the dished-type flywheel. Mercedes list price is $252.00. It is made by Sachs and carries the Sachs number 1861-123-236. It is available much less expensively from aftermarket vendors. I paid $85.00.
The only thing to emphasize here is the correct orientation when installing it. One side is marked getreibe seite. Be sure to position that side towards the pressure plate and the transmission.
Pressure Plate (a.k.a. clutch plate)
The pressure plate for all Pontons with the dished-type flywheel is now Mercedes part number180-250-07-04. List price $242.00. This too is made by Sachs, Sachs number 1882-102-132. Widely available in the aftermarket, I paid $106.00.
Sometimes removing the old pressure plate can pose problems. Other times it backs out easily after loosening the bolts slowly and gradually, using a cross pattern. In my case it was quite stuck in place. I tapped all around the outside and pulled on it. I squirted penetrant around the beveled edge (I found the seam after removing all the dust and dirt). Still no give. Finally, I used a crow-foot pry bar in the hole where the disk is visible and slowly jiggled it off. All the while I had concern that I might damage the flywheel somehow. No problems.
When installing the pressure plate, be sure to tighten the six bolts evenly, using a cross pattern of tightening. I chose to turn each bolt one turn, one after the other. You may have to press the plate in with your hand to get the bolts started. Tighten to the prescribed torque value. (See separate discussion below of bolts and torque values.)
When tightening the pressure plate, the "fingers" will raise slightly from the plate. Pieces looking like large staples should fall out from between the plate and the fingers if you have not previously found and removed them. If they do not, do so now. These are for shipping the pressure plate, not for the system's operation.
The service manual specifies that, depending on the model, there should be a specific distance between the end of the finger and the pressure plate. The specified differences among Ponton models is very small. See the 190 service manual at section 25-1/3 and the 180-220S/SE service manual at section 25-1. To adjust this distance one turns the nuts on the bottom of the "fingers." I could not figure out how to obtain a precise measurement while the flywheel was still in the car. Access was too awkward. This procedure, if necessary, is doubtless doable with the engine and flywheel removed from the car. Based on advice I received, I decided to leave the nuts untouched and let any small deviation from specification be handled via the clutch adjustment later.
Flywheel
To do or not to do, that is the question. As a matter of routine, should one remove the flywheel to have it resurfaced? Of course, if its face is obviously scored, this will be necessary as long as "turning" does take it beyond specifications set forth in the service manual. If there is no obvious scoring or other damage, or if the blemishes are very minor, the question of prophylactic resurfacing arises. After all, at this point you have easy access to it. People come down energetically on both sides of the question.
First of all, the flywheel inside and outside is very likely to be dirty and crudded. It needs to be thoroughly cleaned before you can make a determination about resurfacing. I squirted a lot of brake cleaner spray and cleaned off as much crud as would come. Most did. Dried it with paper towels. Then I used WD-40 and 0000-guage steel wool to remove any traces of minor rust and dirt on the face. Then it got carburetor spray treatment and towel cleanup again. Finally, I cleaned off the face and inside side of the cup with PVC plastic pipe cleaner, a liquid cleaner that dries immediately. (This is what is used to clean PVC pipes for gluing.) That flywheel ended up spotless!
Then I examined the flywheel for cracks, other signs of metal fatigue, and grooves. I gave it the thumbnail-scrape test. It was very smooth.
I concluded that the flywheel's condition did not compel resurfacing. Should I resurface it anyway simply because it is now accessible? There was no escaping the question. I finally came down on the side of those who say "if it is not broken, don't fix it." Resurfacing necessarily shortens the life of the flywheel and may weaken it slightly because the process removes metal. Many professionals report they do not routinely resurface flywheels and in fact seldom do so unless the need is obvious.
In the end my reasoning was that every task includes the possibility of error, damage or injury, no matter how careful one may be. Removing the flywheel carries a certain, albeit minor, risk. Giving it to a machinist for resurfacing involves the possibility of loss, mistake, or damage. I could mess up the reinstallation (been there, done that). I could injure myself. In light of the excellent appearance of the flywheel, I weighed the risks involved in resurfacing it. The scales tipped towards leaving things alone. Of course, all this is a personal judgment.
Here I offer an observation. On some cars (not Pontons) removing the flywheel provides convenient access to the rear crankshaft seal. Some people want to replace this as a precaution. Sometimes the seal is leaking, so one wants to have access to it. Stand down! Apparently that seal on Pontons cannot be reached for replacement simply by removing the flywheel. Generally the engine must be removed and partially disassembled to replace that seal. So if that seal is leaking, the flywheel is not a facile route to it.
Transmission Removal and Reinstallation
Here, I speak only to removing the transmission from beneath the car while the car is on jack stands; that is, for us home garage duffers. My hydraulic floor jack would not lift the car from the front high enough to provide sufficient clearance either to work at the transmission or to drag it out from under the car once it was on the floor. I had to raise the front of the car higher than the jack would go. What to do?
For starters, I activated the emergency brake and put chocks behind the rear wheels to keep the car from rolling backwards. Anticipate safety needs first and always!
Then I placed the hydraulic jack, with a short 2 x 4 wood piece on the lifting plate, under one side's rockers, just forward of the front jack points where the rocker turns towards the engine. Then I raised the jack about two-thirds of its extension. Next I placed a jack stand, also using a similar piece of wood as buffer, under the rocker at about the jack point and extended it. Then I repeated the process on the other side except that I raised the jack to full extension, which resulted in raising the jack stand to near its maximum height. I returned to the first side and raised the jack stand to nearly full extension, using the same jacking process. The reason I lifted the car in stages is that I did not want to twist the body too much. I do not know if this is could be a problem, but I would not risk anything.
This jacking procedure provided ample clearance. The transmission was moved readily from under the car and back. I had plenty of room for access.
Does one need a special transmission jack or transmission adapter for a floor jack? Doubtless it is easier to raise and lower the transmission with such a device than with a regular hydraulic floor jack or with two retirees on their backs struggling with it manually. (I weighed the transmission and bell housing; it weighs 70 pounds/32 kilos.) I used my floor jack and kept a careful hand on it, maneuvering the transmission around. A cloth on the lift plate of the jack reduced slipping around by the transmission. A helper worked the jack handle in response to my commands when I was under the car. Admittedly the transmission came out this way easier than it went back in, but in the end the procedure worked satisfactorily. In sum, using a hydraulic floor jack without any special transmission lifting device is certainly a viable option.
Once the transmission was out, I cleaned its exterior. Inside and outside the bell housing was also cleaned. Everything was very dirty and greasy.
Examine the transmission for leaks. Finding none on mine, I did nothing further to it. I did not disturb the shift levers, one on the top and one on the side. Mechanically the transmission operated properly before I removed it. Know that if you turn the transmission over far enough, fluid will leak out the vent on the top. This vent is beneath a bell-shaped brass cover. I removed the vent and cleaned the screen.
Be careful examining the transmission. You do not want to bend the shift rods or levers. Also, note carefully which rod goes where; they are shaped differently.
Lever the shift fork off the pivot ball. Do not lose the locking ring in the socket. Clean and grease everything. Reinstall.
Replacement Items
I decided to replace every rubber bit associated with the entire enterprise plus a few other things. That included the two round rubber bushings [14] where the shift levers fit to the shift rods on the transmission.
For this discussion note the following illustrations from the Type 220S spare parts book [15], Catalogue "C," dated 1958. Illustrated spare parts books for other Pontons will have comparable pages.
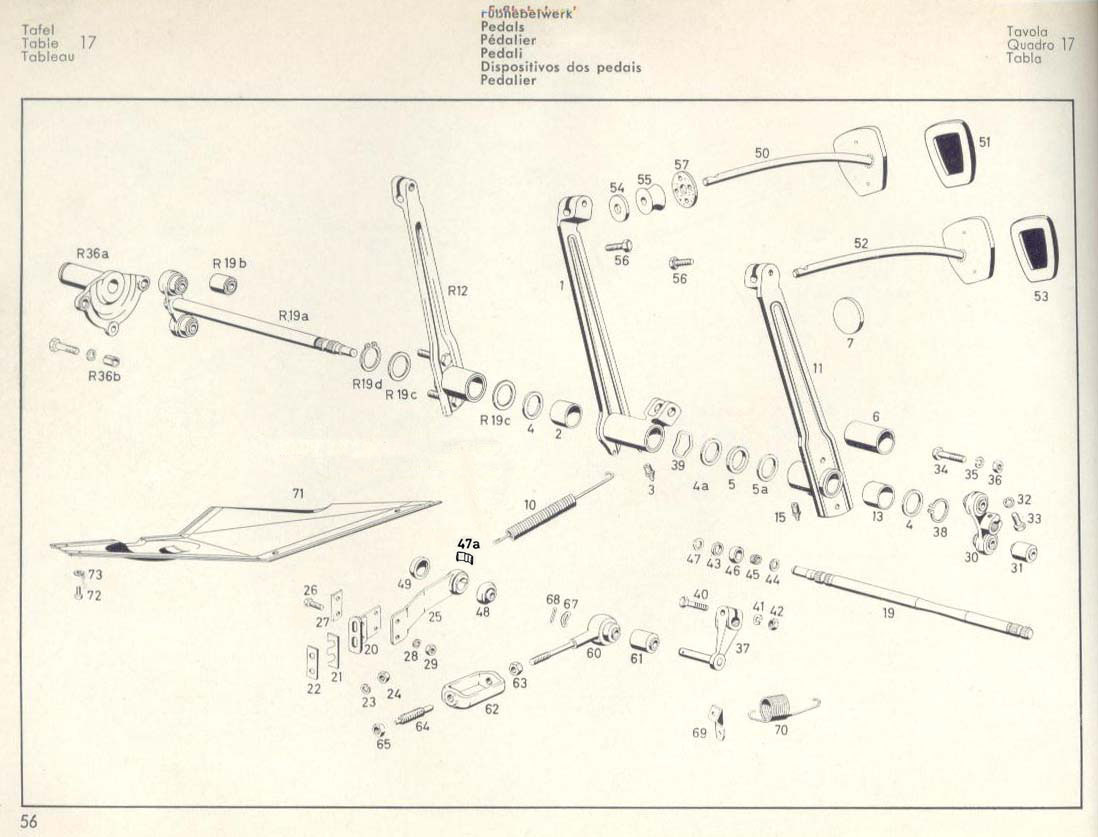
Table 17. "Pedals"
Connecting to the clutch-adjusting bracket (item 62) is a rod (item 37) with a rubber bushing, item 61. Drive this out and drive in a replacement. In doing so, note that one end is beveled, so drive it from the other end. Mercedes part number 186-988-00-10; list price $13.00. Cover cap 120-291-02-88, list $5.00, needs to be replaced; item 49. So too with rubber bushing, item 48, part number 120-291-03-88; list price $9.25.
The brake control rod fits into a bracket (item 25), specifically into something resembling a thick wedding ring, item 46 (do not lose this ring: 186-991-00-29, list $33.50). Inside that ring is a needle cage, item 45. I replaced it, part number 000-98-18-10, as it was destroyed; list price $19.50. The "wedding ring" is stabilized inside item 25 by a small spring plate (sometimes shown in parts depictions as item 47a and other times not shown but required nevertheless); 121-993-00-26, list $19.50. Be sure you have the correct washer, item 44; Mercedes 000-988-010-016, list $1.00. This washer is DIN standard 10 x 16 x 1.
Look at the rubber pieces that fit between the brake and clutch pedal rods (item 55) and the firewall on the engine side. They are probably mush or even nonexistent by now. I replaced mine on each pedal; they are identical. Mercedes number 120-291-03-97, list $4.00. I also replaced the washers, item 54. Part number 136-224-01-66; list price $2.00. This replacement allowed me to be certain I would obtain the correct clutch adjustment as it keys off the brake pedal as prescribed in the service manual.
Note item 57 (Mercedes number 136-290-00-67) where the pedals are depicted. It is misleading. This is a leather piece riveted to a metal piece. It fits inside a plate around the pedal rods on the driver side of the firewall. At $49.00 list price each, I chose not to replace them.

Table 12. "Clutch"
The rubber fork cover is Mercedes part number 120-254-00-97; list price $3.20. By now yours will be torn and stiff.
You may have to fabricate the gaskets on item 42, cover plate. I did.
Note a threaded hole about two-thirds of the way towards the top on the left side of the bell housing. It takes a washer and an air bleed bolt, items 34 and 35. This bolt is some kind of venting device because it has a tube extending from the bottom of the shaft to inside the head where it branches to the opposite head flats. Don't simply plug the hole with a regular bolt. A new bleeding bolt, part number120-251-00-71, lists at $29.50. Frankly, I did not understand why this air bleed is necessary as air seemingly enters the bell housing from other places.
Not shown on any of the above illustrations is the rubber bushing that fits between the transmission and drive shaft flanges. It is part number 120-411-00-60; list $2.20. I replaced it.
Reverse Light Switch
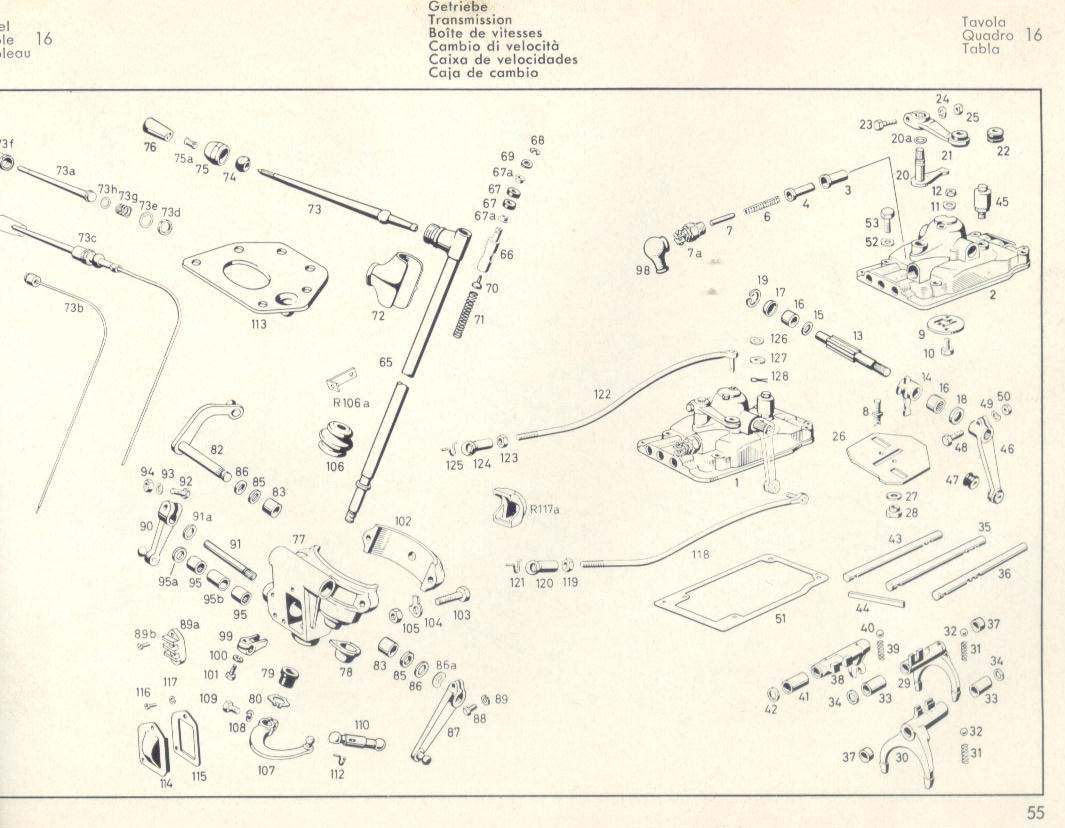
Table 16. "Transmission"
The wire harness (not depicted above) to the reverse lights switch on the transmission, item 7a, connects to it by two tiny bolts. Don't misplace them. If the switch worked OK, leave it alone except to clean it and remove corrosion around the bolt holes. I do not know if it is necessary, but I took careful note of which color wire attached to which terminal on both ends.
Probably the wire harness will be cracked and oil-soaked. I fabricated a new one. See link for the general approach:
The original harness was 26 inches/66 centimeters long. I recall using12-gage stranded wire.
The rubber boot (number 98 in the illustration) covering the brass switch where the reverse light wires connect is part number 000-546-00-35; list price $5.00. And no, it is not identical to the boots on the generator and coil.
Note that there should be a rubber boot covering where the positive battery cable connects to the starter solenoid. This boot is identical to the one that fits over the reverse light switch on the transmission.
Torque Requirements
My flywheel was fastened by bolts that had the marking 12.9 on them. That meant they were highly hardened in metric terms. As I did not remove the flywheel, I did not disturb them.
Considerable discussion developed as to the correct torque value for the flywheel bolts, and it became almost esoteric. Opinions varied as to the correct torque. Then, as he was proof-reading the final article, Jeff Miller referenced the Technical Data Passenger Cars / December 1957 Edition and found the flywheel tightening torques to be listed (p. 123) as follows: 6-6.5 mkg [16] for the Types 180a, 190 and 190SL. The Types 219, 220a and 220S have a tightening torque of 4.5-5 mkg.
I found myself concerned with the six bolts that fixed the pressure plate to the flywheel, item 19 in Table 12 above. The bolts I removed were marked "8G." This was the hardening indicator. It is not the current metric hardening numbering system, so I was confused about how much torque to apply when reinstalling the bolts. Again much discussion ensued, which I initiated. Håkan Johansson and Jim Davis were instrumental in clearing up confusion. The conclusion is that the "8G" bolt I removed meant today's 8.8 metric hardening.
| CLASS | Mechanical Properties of Fasteners | |||||||||||
| New Designation | 4.6 | 4.8 | 5.6 | 5.8 | 6.6 | 6.8 | 6.9 | 8.8 | 10.9 | 12.9 | 14.9 | |
| Formerly | 4D | 4S | 5D | 5S | 6D | 6S | 6G | 8G | 10K | 12K | -- | |
| U.S. GRADE | 1 | 2 | 2 | 2 | 3 | 3 | 3 | 5 | 8 | -- | -- | |
Table A. Mechanical Properties of Fasteners
Source: Web Archive (a.k.a. Wayback Machine) of the "Frugal Machinist" web site (no longer active)
http://web.archive.org/web/20050311000936/http://www.frugalmachinist.com:80/Metric.htmBefore this got resolved, I decided to get new bolts. The new bolts, Mercedes number 304-017-008-048 (list price $1.40), came with a hardening mark of 10.9. This suggests Mercedes increased the torque value for this application. Search as I did, nowhere did I find any authoritative Mercedes document specifying the correct torque for these bolts. websites indicating the torque for untreated M8 bolts with a 10.9 hardening value ranged between about 25 lb. ft. and 36 lb.ft. See the following sites and take your pick:
- http://karmannghia.org/bitmaps/metric.gif
- http://euler9.tripod.com/bolt-database/22.html
- https://www.fastenal.com/en/83/torque-calculator
- http://www.190slgroup.com/tech/pic_part/Metric_torques.pdf
- http://www.mdmetric.com/tech/tech4/3.htm
I put a touch of anti-seize lubricant on the bottom threads of each bolt and went to 35 lb. ft. torque. Nothing snapped.
The pressure plate bolts presented another, more or less academic, curiosity. The Mercedes parts manual lists M8x28 DIN 931 and then M8x20 DIN 933 as replacement. The former is slightly longer and has threads part way up the shank. The latter is slightly shorter and has bolt threads all the way to the head. Was this significant? Did this change mean that something else had changed along with this different bolt? Something expensive? Perhaps nothing more than a bulk-purchasing convenience? I don't know, but I don't think so. The difference in length is eight millimeters. The bolts I removed and the ones I bought were of the subsequent M8x20 DIN 933 designation although, as noted above, the hardening mark differed.
Disclaimer
The author has provided accurate information based on his research and personal experience. Use the information at your own risk. Verify it to your own satisfaction. No guaranteed is implied or warranted.Caution
Purchasers of any of these SKF or FAG bearings should verify that the bearing obtained should not be so old as to have over-hardened, caked grease inside due to too much time on the vendor's shelf.Thanks
Particular thanks go to Jeff Miller, the owner-editor-publisher of the Mercedes-Benz Ponton web site (www.mbzponton.org). As usual, he labored mightily to transform my original Word document into a usable web page. Len Sokoloff provided the scans from the Illustrated Parts Manual Model 220S. Joe Alexander, Jim Davis, and Henry Magno provided pre-publication peer review, which was indispensable. They are not responsible for any errors.Request
Suggestions for additions and corrections are welcome.
Footnotes
[1] a.k.a. = also known as.
[1a] "Industry standard" refers to bearings that have specified characteristics and tolerances that meet established industry norms. Any bearing manufacturer would have to meet those norms. Therefore, any bearing marked with the 6202 number, whether made by SKF, FAG, or other, would meet those norms for the 6202 and would be interchangeable one with another. Mercedes and other auto makers use such bearings, often in several applications within the same vehicle and on different models. The same happens with oil and grease seals. On rare occasions, however, seals and bearings are unique to a specific vehicle application. They are still available in the bearing market, but sometimes not at such a great cost percentage savings as with industry standard items.
[2] Interesting to note that the 6202 standard bearing fits the following additional applications on Pontons: (1) 180b and 180D (1956-58) - fan front and rear, water pump, injection pump drive (180D only); (2) 180a, 190, 190D, 190SL, 220a, 220S (1956-59) - water pump; (3) 180b, 180DC, 180c, 180Dc water pump rear, fan pulley front and rear, injection pump drive. Apparently the 220SE did not use the 6202 bearing anywhere, or the literature simply failed to mention the 220SE, or the 220SE was discussed on a page I did not receive.
[3] For details see section 41-4/1 of the 180220S/SE service manual.
[4] Thierry Savidan reports he bought a new one in Thailand for US$10.00.
[5] Courtesy of Joe Alexander.
[6] Sometimes called the release bearing carrier. Confusion may arise when dealing with German suppliers and German translations. Sometimes the Germans, when discussing this item in English, refer to it as "release bearing" because it "bears" the ball bearing (which in English is referred to as "release bearing"). Until I realized what was happening, this caused a significant amount of confusion when communicating with native German speakers. For native English speakers the "release bearing" is the special sealed ball bearing. For the Germans, "release bearing" can refer to what we call the sleeve or carrier.
[7] FAG technical data also list this bearing as equivalent to SKF 616524 and SKF 616524 A, which SKF reports to be obsolete and discontinued. These bearings had the following dimensions (in mm): 40.0 inside diameter, 70.0 outside diameter, 18.0 width. This is extremely close to the dimensions of SKF 306540 and the discontinued SKF 306654 B.
[8] This number is obviously peculiar. It does carry the 981 number, which is Mercedes-Benz speak for bearings.
[9] Mercedes-Benz reports that this number has been superseded by 000-981-43-02. This is their current bearing number for the Pontons and is SKF 360540. Note the 981 bearing series number.
[10] No longer a valid number.
[11] Note, this is the same number M-B currently uses for the "new type" combo.
[12] Karasch offers FAG 501929 C for $74.00 plus shipping.
[13] Just to confuse matters, courtesy of Håkan Johansson I have a copy of an SKF product sheet for the Ponton range. It lists SKF 306564 B as the clutch release bearing for all Ponton models, except the 220SE, for the duration of their production. Thus I cannot say for certain when the SKF 306540, with its slightly different dimensions and with its requirement for a different sleeve, came into use. But come into use it did, and M-B now supplies it for the Ponton clutch release bearing application.
[14] My 180-series transmission wore a Type W111 "Fintail" series cover. This combination works fine. I assume this happened when my car was converted from Hydrak during the 1960s. The rubber bushings are different, so I am not providing the part number.
[15] Courtesy of Len Sokoloff.
[16] 1 mkg (kilogram-meter) = 7.233 ft-lbs.