Photo 1.
James W. Pancoast / August 7, 2002
panhurst03@rivnet.net -or- pankhurst03@aol.com
Reference: Ray Ilich's headliner installation guide
Introduction
"Isabella" is a 1959 220S sedan with a Webasto sunroof. I do not know to which, if any, other Ponton sedan models ("Bottom Feeders" all!) this installation will apply, but suspect it will to most. I have always been glad that my car has a sunroof. This early version of one of today's more common and desirable accessories. Be warned: under the best of circumstances, this is not an easy weekend project. That said, I feel like it can be done with gratifying results if undertaken with average manual skills along with the time, space, resources and commitment necessary for a good job. It took me +/- 100 hours to do the job. What follows is just my experience with the restoration. I KNOW there are better ways to do it. I hope others will add to this with their ideas. Basic useful information will be found in the 180/190/220 Service Manuals, which give brief coverage of headliner removal and installation as well as a few helpful pictures. There is also a section on how to remove and install the sunroof. Additionally, Ray Ilich wrote an excellent article for headliner and windlace installation in non-sunroof vehicles. I recommend both sources be studied before beginning.
Editor's Note / November 13, 2003:
The size of the Webasto roof has come into question several times on the International Ponton Owners Group (IPOG) mailing list. The illustrated parts catalog states that you need to "specify color and body number" when ordering the replacement covering that would be used in a restoration because the W120/W121/W105 Pontons and W180/W128 cylinder Pontons have a different size Webasto roof. The W120/W121/W105 models measure 134cm x 93cm (53" x 37"). The W180/W128 roofs measure 142cm x 111cm (56" x 44") on the outside.
Materials
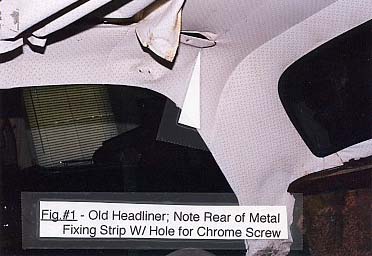
There are many sources for the materials required. My choice was certainly not cheap. However, with very limited experience I was anxious about taking on the project and decided to go with quality, at least by reputation. Some years ago in one of the online email groups, Len Sokoloff had mentioned World Upholstery in California (800-222-9577) and I heard good things about them from other sources, so they were eventually chosen. I have no regrets, but they refused, probably correctly, to make a headliner for a sunroof model as there is no pattern available such as there apparently is for the solid roof sedan. And although I contacted a reputable "old car" upholsterer in our rather remote area, he wanted no part of the headliner part of the job either, even with the car at hand for measurement. Another general restorer contacted, obviously without enthusiasm, said he could do the job eventually, but let me understand he would take his time getting to it and would provide no estimate of costs other than his flat rate of $60/hour plus material. This sounded like a money and time pit without bottom. In desperation, I went back to the upholsterer and begged! A kindly man and AACA member, he agreed to do the sewing if I would remove the old liner sufficiently intact to use as a pattern. However, I was to do the fitting/installation and take all responsibility. Frankly, all this was a bit intimidating at the time, but looking back, the challenge made the project much more fun! Those of you with experience, sewing skills and equipment or access to competent professionals will be spared many of my anxieties. Be aware that if your car has had its liner replaced, as most have by now, and this is used as a pattern, this may or may not match the original exactly. My car was redone nearly 20 years ago and when I bought "Isabella" in 1978, her original headliner had already deteriorated to the extent that what was not missing was dangling down in multiple strips of dirty brown-beige fabric into the passenger compartment. When this interfered with the previous owner's vision, he just tore away the offending piece and tossed it. No way could this liner have been used as a pattern! My original replacement work was done by a reputable shop but the results were only fair. While the job generally held up OK, it was not very good cosmetically. A lot of the yellow contact glue was visible around the edges and had seeped through the holes of the off-white perforated plastic material used and some of the glued edges were coming loose (Photo 1).
Photo 1.
Later Mercedes-Benz models had a beige plastic, which was similar – I recall it on models of the 1970s and although more durable than that originally installed, it is not correct for this car. I eventually chose, after seeing samples, a very close match in medium brown of English wool broadcloth ("mouse fur", Photo 2) as I felt this was probably as close to original as possible and is richer in appearance than vinyl.

Photo 2.
The wool was expensive @ $59/yard (56" wide) and I got 4.66 yards, which including the interior lining of the folding sunroof, was barely enough (5 yards would have been better). A nice feature of cloth versus vinyl is cloth has a little more "stretchability", which makes installation easier. Before ordering fabric, it helped to make a "map" of my fabric on paper and try various locations for the pieces that were to be cut out for the tailoring/sewing work. This will tell how much to order, lessens waste, and shows your upholsterer that there is enough fabric. Be sure to allow extra margins at all edges so you will have ample to tailor to your application. The excess will be trimmed away but insufficient fabric means reordering and running into potential problems with availability, back ordering, different dye lots, etc. For the exterior, I was sent swatches of three black fabrics (Photo 2), one being a standard convertible top material of nylon, one of domestic vinyl and one imported. I chose the imported "Everflex" vinyl with a low luster leather pattern embossed on the surface. This had a bonded supporting fabric on its underside. It was pliable, yet with enough body to fold properly, and I liked its appearance and feel. I got 2 yards 48" wide @ $42/yard.
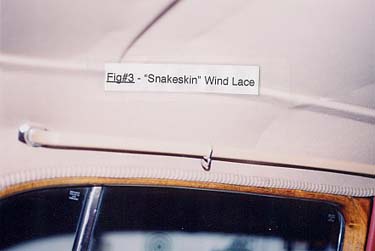
Photo 3.
Last, there was the choice of material for the wind lacing (tubular interior seal around the doors) between headliner fabric, leather matching my upholstery, or a two-tone brown/beige pattern in alternating spiral jagged thin stripes, which from an old photo, I believe to be correct for the car. While this looked a little weird on arrival ("snake skin") and I thought long before installing, it turned out sort of nice and I am glad I went with it. It looks different, very "German" (Photo 3). Twenty four feet were required @ $4.20/ft.
Dismantling
References ( Service Manual Model 190 )
- Job 78-1 / Removal and Installation of Sliding Roof
- Job 78-2 / Removal and Installation of Sliding Roof Fittings
- Job 78-3 / Troubleshooting Hints for the Sliding Roof
The best advice here is to approach dismantling deliberately, and as an opportunity to learn how to install. Photos help a lot! My project was done along with replacement of floor covering and reupholstering the interior, so the interior was stripped. Yours will definitely be made easier by removal of front and rear seats at least. A small portable stool inside will give your "tail end" a welcome place to sit and save knees and back. The old sunroof needs to be removed first. The manuals give a decent description (see Job 78-1, 78-2), and taking apart the two fabric layers is easily done. There are three rear transverse panels and five side panels in the fixed part of the headliner that were kept intact to serve as a pattern for the upholsterer and the seams between them were not taken down for that reason. The sliding portion had five panels and a piece of white cheesecloth, 3-4" wide, sewn to the underside (upper) of each transverse seam so as to be invisible from inside the cabin. These were glued over the bases of the transverse sliding steel pieces to support this section. All of these things were marked with a felt pen to identify their location and orientation (driver's side / passenger side, front / rear, up / down, etc.) immediately on removal. The rear-most of the liner fabric was fixed to the body's steel roof with a metal fixing strip to which the fabric is glued and the strip secured behind holding tabs.

Photo 4.
The heavy, sliding front steel piece with a latch (the manual calls this "main bow assembly" or MBA, Photo 4) locks to the front steel shell when closed and a rear one secured by bolts, which anchors the rear of the outer sunroof fabric to the rear body shell. Beneath the latter was a nasty tarry sealer that had to be removed with scraper and solvent since it soils everything it touches, including the newly installed liner fabric! I marked where to reapply modern automotive grade black silicone sealer later. There are an additional three intermediate sliding transverse pieces of lighter steel mentioned earlier. Each has a base to which a spring steel mounted "bow" is attached to the rear. A fourth bow is attached to the front sliding piece (MBA). These bows support the outer top fabric when open and allow it to fold in an orderly fashion. The bases will support the inner liner of the sliding roof via the attached cheesecloth. Photos were useful here (and elsewhere) to insure that later installation will be correct. It is very easy after a time to forget or confuse where and how things fit. The aluminum side rails and front trim were then removed for cleaning, polishing as well as to access rust repair and painting needs beneath.

Photo 4a.
Originally, there were two braided wires incorporated into the outboard seam of the sunroof's edges.[1] These anchored front and back and were meant to be taut with the closed roof and are clearly shown in the parts catalog (reference item 34a in Photo 4a). These had been eliminated earlier in my car and instead, the three base ends plus those of the forward bow had been fitted into small slits made in the underneath layer of sunroof material about ½" back from the edge. This results in slight "scalloping" of the edge, not objectionable to my eye. It functioned well for 20 years, so I stayed with it because the wire arrangement looked to me difficult to install and adjust correctly. Decide for yourself which way to go here. Sun visors, kick panels, grab rails and old wind lacing also came out. The rear window has to be removed and a new window seal ordered. Also, the covering for the little rear deck space between the rear seat back and the rear window has to be removed (see Ilich's article - my car did not have the cardboard base Ray describes, only bare metal beneath). The inner covering of the "B" pillar (between front and back doors), windshield and window wood trim were removed. I removed the dash wood and steering wheel to protect them from glue droppings and accidents and recommend that you remove or mask anything else that you want to protect. The interior cabin portion of the headliner is now removed. Much of this is glued and I attempted to keep it as intact as possible (including seams) and labeled each piece as it came out. Be sure also to see Ilich's description of the three fixing rails on each side encountered here. The center of the fabric strips outboard of the sunroof opening are supported by eight (four per side) weird, curved, heavy cardboard pieces, ½" x 4", which fit into little cheesecloth pockets above each seam. One end slips beneath a metal tab medially and the other into a hole in the metal roof laterally. I saved these as patterns to make replacements using automotive cardboard kick panel material, which works OK. Observe here also how the inboard side of these fabric pieces are glued to a long metal piece that clips to the edge of the sunroof opening. Particularly look at the flexible narrow rear end of this fixing strip, how the fabric is attached here (Photo 1) and its correct installed position with front and rear chrome screws through the liner fabric. On the outer side, the fabric is tucked beneath the lower edge of the fixing rail and secured by segments of ¼" rubber tubing. The tubing was removed as intact as possible to measure lengths and diameters for buying (Pep Boys) replacement. The rear full width section of headliner is supported by two heavy steel wire bows that fit into cheesecloth pockets on the liner seams and lock into holes on each side of the inner steel roof. Each bow is a little different in length, so mark them front and back.
Headliner / Sliding Roof Fabrication
The removed headliner/sunroof pieces then went to my upholsterer with the new fabric. He provided a fresh "core" for the wind lacing and covered it with the "snake skin." I asked him to make the "tail" of the wind lace 2" wide, as Ilich recommends, which helped with fitting it later.
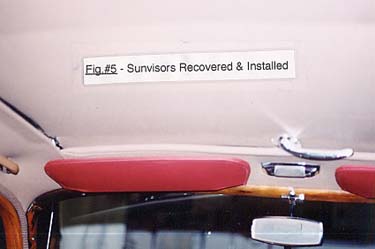
Photo 5.
Also, I had my sun visors covered (Photo 5) and asked him to save all leftover fabric for me. I took him, too, an intermediate sliding base/bow so he would know how it fits and attaches by glued pieces of 4" wide gauze sewn in each inner seam. Also the aluminum part from the front locking piece (MBA) was included so he understood how this must fit snugly into the pocket that he constructed in the front edge of the roof fabric. He needed the rear fixed steel piece in the same way for making the rear pocket. The headliner was to be be attached laterally to each steel base with rivets, so I pointed this out so he would make the lateral seams wide enough to accommodate this. The more he knew about the installation, the more likely I felt I would get a satisfactory job. I typed out instructions, included a list of the parts that I left with him and gave him a copy. When the completed work was picked up later, I checked that it matched the old patterns, had ample margins and all my parts were there. He really did a great job.
Repair
The metal sunroof base/bows were my project's biggest headache. To begin with, most of the ½" x 4" spring steel strips were broken and I could not find replacement material, even through a local machine shop, except at unreasonable cost. I finally tried good quality hacksaw blades, ground off the teeth, cut to length with 2 holes drilled into each end. I doubled these for each replacement for added strength, one overlying the other, then used steel rivets to install. But this stuff is terrible to work with. It does not weld well and is tough to drill. Be prepared to break several saw blades, wear out drill bits, and cuss a lot. They require that a 30 degree angle be bent into each, but the metal is very brittle and will break or crack easily. I checked each completed bend with a magnifying class for tiny cracks that will break later.
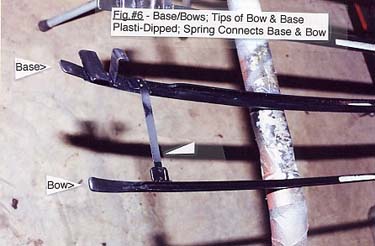
Photo 6.
These #*%@! things finally went in OK (Photo 6), function properly and have held up so far (two years), but surely, surely, there has to be a better solution out there somewhere. Please pass it along if you find one! Furthermore, although all my bases were there, two of the four bows had broken off the springs and were missing. Replacements from a parts car or dealer would definitely be the best solution, but likely difficult to find. Even if I found used replacements, I would want heavier spring material than the original!
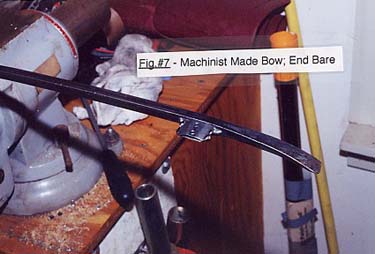
Photo 7.
My machinist heat bent some 1/2" steel stock to match the curvature from one of my remaining original bows and ground the ends to match (Photo 7). This resulted in a bow with similar dimensions, but heavier than the original. However, the doubled spring steel seems strong enough to handle the extra weight.

Photo 8.
As you will see on dismantling, the removed sliding metal bases with attached bows have little metal feet (Photo 8) that travel in the tracks when opening and closing the sunroof. Each foot was originally covered in leather and tallow applied as a sliding lubricant (per shop manual). In my car, and likely yours, the leather was worn through exposing bare metal, and the tallow was a black, sticky mess. All this caused the mechanism to jam and make it difficult to slide. I tried upholstery vinyl as a leather substitute, but it does not slide well nor does Plasti-Dip rubber covering wear well enough.

Photo 9.
I ended up going back to leather and sewed in "shoes" (Photo 9) over the metal feet (placing the heavy stitches away from wear surfaces) and then applied silicone spray to both the slide metal and leather. This worked better, should not attract and hold dirt as a grease will and I can respray and clean as needed. Again, there may well be a better solution and if you come up with one, be sure to share. The outer ends of these sliding metal bases will be inserted into slits beneath the outer seam of the roof material as mentioned earlier and need to be cushioned so as to shield the fabric from wear from the bare metal contact. Dipping the ends of both bases and bows about 1 ½" into black Plasti-Dip rubber coating (Ace Hardware) six or more coats, and allowing the recommended drying between coats worked nicely (Photo 6). However, Plasti-Dip spray, also available, goes on too thin to cushion well. All removed metal top and interior pieces were cleaned, rust removed and spray painted black. The roof recesses into which the aluminum slide tracks fit had some rust which was repaired and painted body color.
Installation
It is a big help to have a large work surface like the pro shops do on which to lay out material, measure, cut fabric, etc. A 4' x 8' piece of 3/8" plywood on elevated saw horses and covered with an old clean bedspread worked for me. This was positioned in the shop so I could access the work from all sides. Also, a chalk tailor's pencil (Walmart) allowed temporary marks for measuring, etc. to be placed on the fabric. A wrinkle removing spray used by drapery installers apparently is just diluted alcohol, but was helpful and leaves no stains. It is applied lightly and allowed to dry (of course, this stuff will not work if you have chosen vinyl material). A word about contact cement: Mine was supplied by my upholsterer from a five gallon commercial container into a quart glass jar. He cautioned me to use only fresh, highest quality glue, apply thinly with a brush - not spray can such as 3M provides - to both surfaces, and allow to dry a minute or so before joining; also, to keep the lid on the container as much as possible. He suggested pouring out only that amount I could use in an hour or so at any one time. I used a little over a pint for the whole job. Another tip: Wash your hands frequently when handling the fabric. Sweaty and/or dirty hands with glue on them will surely stain. A most helpful tool was the spring clamp. I recommend at least a dozen in an assortment of sizes for holding fabric temporarily in place. Another thing to watch for: On superficial examination, my fabric appeared to be identical on both sides, but, in good light, my upholsterer showed me that actually one surface was better finished and meant to be the exposed side, so check yours carefully. It will show if the sides are mixed. With the headliner/roof back from the shop, the metal fixing rails over the doors were loosely reinstalled over as the wind lace (as per Ilich's article), then the rails tightened. The extra fabric width on the tail of the wind lace was appreciated here as something that can be pulled on to help it seat properly against the rail. The fit needs checking frequently with doors closed. After the wind lace was installed from the rear to the forward end of the front fixing rail, the remaining installation along the front door opening's forward edge down to the floor was delayed until after headliner installation later. I coiled the remaining free wind lace, put it in a clean plastic bag and hung it out of the way to keep it clean. Now back to the liner: Starting at the rear, this largest area of liner was suspended temporarily by the two bows over the rear seat area, each applied in its respective pocket (this portion is like the solid roof sedan's installation, so see Ilich's article for details). From here, I then measured and marked, on the back of the fabric, so as to know exactly where the window opening should be, but did not cut it out until after gluing around the window. To be sure the liner was centered, I matched a center mark on the fabric back with one on the the center of the car fore and aft, both above and below the window. Completion laterally and below the window was done by bringing fabric well over the "deck" between window and back seat. All of this was done with glue. Permanent installation forward of the rear window work was left until later since access to the space above was needed for the sliding roof installation. As for the sunroof itself, the black outer layer was sewn to pattern with a wide seam, approximately 2 ¾", on each side and pockets fashioned on the bottom side in front and back.
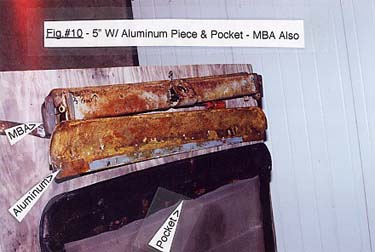
Photo 10.
The front pocket will hold the long aluminum piece (Photo 10) 5" wide from the top of the MBA and should fit snugly. This will then be mated to the heavy underlying MBA with steel screws and glue. Access to these screws beneath the top fabric is limited, so it is necessary to plan which screws go in first. A right angle screwdriver helps. After screw installation, the upper pocket layer was glued to the aluminum beneath it.
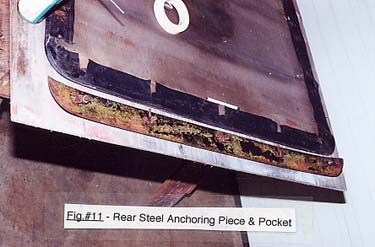
Photo 11.
Then the heavy steel rear piece (Photo 11) was installed temporarily in its pocket. All of this part is done outside the car on your work table. The aluminum tracks and front trim were then reinstalled, all but the last two screws on the rear of each track. This is to keep the tracks horizontally straight enough to allow reinstallation of the sliding roof and the feet of the sliding steel bows and front locking piece to fit into the floating rear ends of the track. Double sided ½" foam emblem mounting tape (available at NAPA) was used beneath the flange outboard of the sliding track as a seal and clear silicone sealer applied generously for water tightness to each screw hole before applying new stainless screws. As the screws are tightened, the tape becomes compressed and all but invisible. After installing the lock, a first trial installation was done of the MBA, attached roof material and the rear anchoring steel piece in its rear pocket. This is an awkward combination for one person to handle; either use two people, or, as I did, cover the rear trunk area with thick blankets so as to rest the rear piece on this while each foot of the MBA is carefully fitted into its track. After sliding this forward to its locking position, the rear piece was temporarily mounted to the car's roof to be sure of fit. After satisfied with fit, the partially assembled roof was removed and returned to the work table. Everything was turned upside down to begin fitting the inner headliner layer. A fore and aft center line on the fabric was matched with one on the underside of the MBA. Then the front most seam in the liner was matched with the forward bow which is attached to the MBA (Photo 4). The bow and seam were clamped together temporarily. The fabric was stretched forward to the rear edge of the MBA and marked to show where on the fabric the attachment with glue to the front locking piece should begin. Clamps were released and gluing commenced.
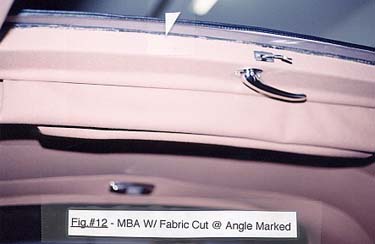
Photo 12.
After covering the underside of the MBA, fabric coverage was continued up its front face containing the latch opening to the angle beneath the protruding front lip. A straight edge and fresh knife blade were used to trim away excess material at this angle which leaves the cut edge of fabric hidden beneath the lip (Photo 12). Then after reinstalling the roof, the MBA was moved forward and locked. The black outer roof was carefully rolled up from the rear leaving the headliner attached to the MBA free over the sunroof's opening and the outer roof material with its inside out draped over the windshield and hood, again using blankets as protection.
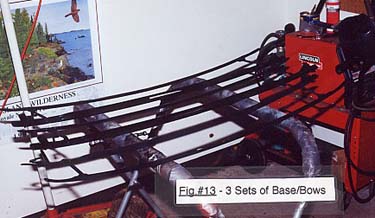
Photo 13.
Next, the three base/bows (Photo 13 and Photo 6) were installed with their feet in the tracks and the bows facing to the rear. The leather covered feet were checked to be sure they moved freely in their tracks and did not bind. Each base/bow had previously been marked "front", "middle", "rear." The free rear end of the headliner material was passed under these and the rear end fit around the locking ¾" wide rear metal fixing strip temporarily. The fabric was stretched and worked until it was free of sags and wrinkles and then marked where the rear cut will be after the rear piece was glued and installed later. The fabric should be passed from the front under the fixing metal strip, up over its rear edge, then forward over the top to the front edge and underneath again to the rear edge where it is marked showing where the cut is to be made. A felt tip pen can be used here since it does not show. After removing the three metal base/bows, the roof with attached fabric was again removed to the work table, upside down.
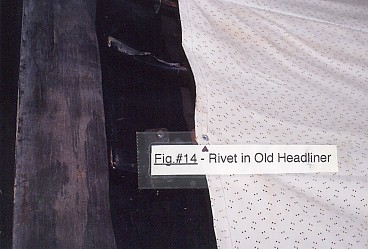
Photo 14.
At each side of the bases is a hole in the steel (Photo 8) for securing the outside edge of each transverse seam of the liner fabric to the base with an aluminum rivet (Photo 14). Protecting the seam stitching, corresponding holes were made through both layers of the outer seam of the liner fabric (use ice pick and awl to stretch the hole) and rivets installed with a small washer inside, checking that the base/bows were in order (front-mid-rear) before riveting. The rear transverse cut to the headliner fabric, previously marked with the felt tip pen (previous paragraph) was made. Then, for the last time, the roof with attached material was reinstalled in its tracks, the front piece locked and the rear cut edge of the headliner permanently glued to its metal fixing strip, folding the fabric as described above. The fixing strip with the newly glued fabric was installed beneath the two metal tabs temporarily. The fabric will be fairly taut at this point. Straight pins were used to temporarily attach the suspending gauze strips at each seam, adjusting each as required to avoid wrinkles and sags visible from inside. This gauze attachment was done first around the front bow attached to the MBA. The three rear gauze attachments are to the bases, not to the bows. When satisfied, the gauze was marked and the pins replaced with glue. Any remaining mild wrinkling was removed by spraying with wrinkle remover. Now, the liner was released again at the rear with its attached fixing strip, everything moved forward in the tracks, and the installation of the aluminum tracks completed at their rear, again using the sealing tape and silicone sealer in the screw holes as earlier. The rear of the liner was then permanently installed beneath the clips after a final check for tautness without wrinkles. The clips were bent down with a soft faced hammer to hold the fixing strip and attached fabric firmly. The black top which was rolled up forward during the headliner part now was rolled to the rear with its attached rear metal piece. After a final check again for tautness and fit and applying black sealer between the rear piece and body as well as to the bolt holes, the rear piece was glued in its pocket and reinstalled by way of two bolts applied through the metal holes from the interior of the cabin (good picture of access holes in manual). The outer tips of the sliding bases (previously cushioned with Plasti-Dip) were inserted into little slits cut into the undersurface of the lower of the two layers in the outer seams of the roof material. These slits were transverse to the long axis of the metal base. They were placed about ½" back (much more than this will make inserting the base ends too difficult as they are not flexible) from the outermost seam and the cut made just long enough to fit snugly around the inserted tip. Naturally, measuring and marking accurately for the spots to cut the slits is important, but not too difficult with the roof installed in place and partially open. Of course, care was used to cut through only the lower layer of fabric and not to make the slits too wide. The three rear bows were left free at each end; however, the front bow attached to the MBA had its ends tucked into the undersurface of the top's outer seam through slits as was done with the base ends. The installation of the sliding portion of the roof is now complete and the interior liner part that was delayed from the rear window forward is now finished. The newly completed sliding roof was folded to its extreme rear open position to get it out of the way. The two heavy wire bows inserted in their gauze pockets and the liner fabric centered over the front to back center line drawn on the inner steel roof forward of the rear window and matching it to one on the fabric's underside.
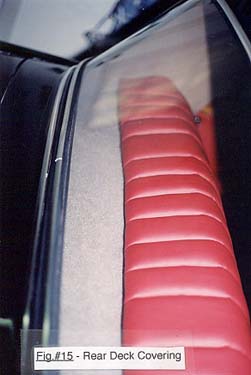
Photo 15.
The rear window and deck area (Photo 15) had been completed earlier and now installation was continued forward by bringing the fabric, with the two heavy wire bows installed into their holes on each side and in their fabric pockets, to the rear most of the fixing rails along the rear door edge on either side by applying glue. Installation here is like that in a solid roof sedan up to the rear edge of the sunroof opening, so see Ilich's article for complete instruction. The forward edge of this full width of material was passed over the inner steel roof's rear edge and glued in place to the top surface after wrinkles and sags were eliminated. Some cutting was needed to accomplish this at the angle where the corners meet the narrow pieces that cover the area between the outer roof opening and the door openings. Continuing forward was by suspending one of narrow fabric side pieces, which will cover the area between the sunroof and door openings, by placing a new cardboard strip into its inner gauze pocket at each seam. A small transverse opening was cut in the gauze for the blunt end which fits beneath a steel tab, and another for the tapered end which fits into a ¼" hole laterally. To fit properly, the cardboard has to bend (without breaking or creasing) a little so the concave side faces down. Consequently, each had to be trimmed to just the right length and shape to perform its support function as well as to remain securely in place. This takes time and patience so be prepared to provide both for this section to come out looking good with no wrinkles or sags and the liner having the proper curvature following that of the roof line above it. To secure the inboard edge of this section, I chose to install the metal fixing rail first to the lip of the outer sunroof opening and then glue fabric to it, eliminating wrinkles progressing rear to front. Excess fabric was then cut away. This top surface with the cut shows with the roof open, so make the cut laterally at the angle using a straightedge and it will look better. The rear most portion of this edge is then finished and photos taken earlier will help with this junction of fixed and folding headliner which is a little tricky. A new chrome screw and collar is used in front and back through the fabric to further secure the strip. The location of the screw holes need to have been marked earlier, of course. On the outer side, this piece is tucked, along with the rubber tubing, beneath the fixing rail and excess cut away. No glue is required and any any remaining raw edge is tucked in. Progress is from back to front and using technique as per Ilich's article. As headway is made on these side pieces, the holes for screws and bolts mounting the three bases on each side for the grab rails are covered, thus hidden, with fabric. Mark the approximate location of these with arrows on masking tape scraps or by some other method. After you are satisfied with the fabric installation, the hole can precisely be located with a pin or ice pick, dilated with an awl and then a screw inserted halfway to mark the place until courtesy lights, grab rail, visors, etc. are replaced later. In front of the fixing rails, fabric was glued, avoiding wrinkling, to the front door pillar nearly to the windshield glass and far enough down so the edge was be covered by the wooden windshield trim when reinstalled. The forward piece of wool covering between the front edge of the roof opening to the windshield was installed next. Having the old piece to refer to showed what was required and how it extended over the lip of the roof opening to include the female portion of the latch mechanism. Excess fabric was cut away when glued in place after making sure of where to cut. Screw holes for sun visors, courtesy light, and wood windshield trim were identified and marked as before. The wind lacing from the front upper door opening to the floor was then finished by installing with glue. Down to the level of the dash the "tail" will be hidden beneath the reinstalled windshield wooden trim, then between the outer edge of the wooden dash and the door, and below this to the floor the "tail" is hidden by the reinstalled kick panels. Installation was done temporarily and checked repeatedly with the door closed to be sure it fitted properly before final glue application. Also, the distal raw end of the wind lace was over sewn after cutting off the excess length. This keeps it from fraying and helps to keep the foam core in place and from "migrating." The over sewn end is fixed and concealed beneath the floor covering or kick panel. Completed last was covering the rear deck area below the rear window. An inexpensive 1/8" thick roll of material specifically for this purpose is available ($10, Pep Boys) in beige, medium gray and black. It can be cut without binding the raw edges. A paper pattern was made of the area and the covering material cut out, tailoring the rear and outer margins to perfection and installed with glue. Enough excess was allowed in front for bringing this edge well over and onto the metal area back of where the seat will be installed so the edge will be concealed. There are a couple of large humps in the steel floor of this deck area, but the material is flexible enough to go in without wrinkles and it looks fine on completion (I hope it is resistant to UV fading, but time will tell!).
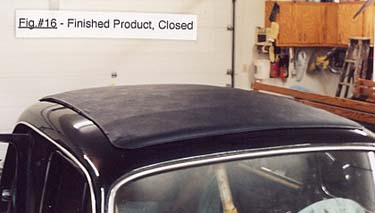
Photo 16.

Photo 17.
OK, after reinstalling all the trim, visors, grab rails, rear window with new seal (I had a glass shop do this - caution them to be careful of your paint and new headliner) congratulate yourself for investing the time, thought, money, effort and perseverance to get the job done. Trust me, whether you did it yourself or had it done, you will enjoy it each and every time you get in your car!
Footnotes
[1] Marwan Nusair, owner of a 1955 Type W180 220a Ponton sedan and member of the International Ponton Owners Group (IPOG) writes, "I installed my sunroof last weekend and it seems to work well. I have since made some adjustments to it to make it fit better, and also to repair a damaged adjustment screw. The two wires that fit into the seam at the right and left edges of the fabric have to be adjusted to the correct length. This is a tedious process but quite simple, involving drilling out (careful not to damage fabric) the rivet and spacer I am using, moving the wire in or out, and re-riveting. It started out with the right hand wire a bit loose and the left hand wire a bit tight, so the closed sunroof front bar was at a slight angle. The chrome strip showed a bit at the left and was a good half inch back on the right. Also, on the rear bar, there are two adjustment screws, one on each of the second and fourth hold-down bolts (there are five). On one of mine, the adjustment screw had sheared a long time ago, so I had my local mechanic weld a new threaded rod (made from a metric screw of the right sort), and I cleaned it up with a grinder and ran a metric die through it to get the threads to work smoothly. This is now waiting for the silicon sealant (fabric to frame) to dry and should be in this evening. The sunroof has turned out to be a lot more work than I anticipated, but most of it was the learning process. If I did it again, it could all be done in a single weekend."