Len Sokoloff / len@sokoloff.com
North Carolina, USA / 1959 220S cabriolet
Thread Repair in the Aluminum Head of Mercedes-Benz Ponton Engines
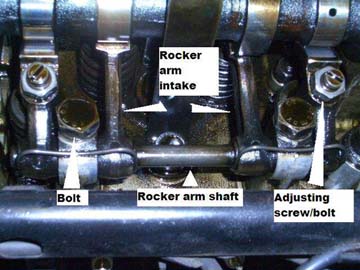
While removing one of the bolts from the rocker arm support tower, I noticed that it was coming out with quite a bit of difficulty.

When it finally came out, I noticed that its threads were rough and nicked in several places.
While trying to reassemble the unit, the bolt would not screw in even after attempting to chase the threads with a tap. Upon inspecting the bolt hole, I could see that the threads were damaged.
Apparently this is not an uncommon problem. Per Joe Alexander, "This is a fairly common situation. These bolts are meant to take only 28 ft. lbs of torque. They are frequently over tightened ruining the threads in the cylinder head. The steel thread insert will be much stronger than the original aluminum threads."Never having done a thread repair of this type before, I called upon my son, Jim, for his advice and expertise. I spend many, many hours exchanging e-mails with him as he walked me through the process. I have to give a huge thanks to him for his help and patience. Based on his advice I selected the Time-sert system over other thread repair systems.
The Time-sert website can be found at www.timesert.com. If you go to the metric page, www.timesert.com/html/mtrcsert.html, there is a very nice video of how the Time-sert kit is supposed to work in theory. Please note that the video shows a power drill/vertical mill being used for the entire process. This is fine if you have the head on the bench, but with the head in the car, you have to cut the threads by hand. You can use a power drill for the removing the old damaged threads and for counter boring if necessary. Everything else is done by hand.
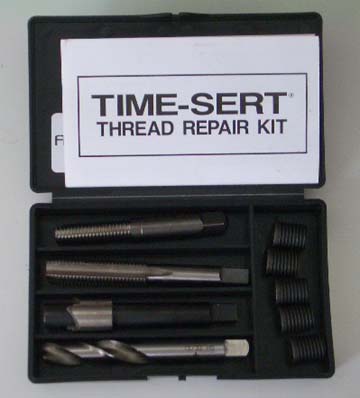
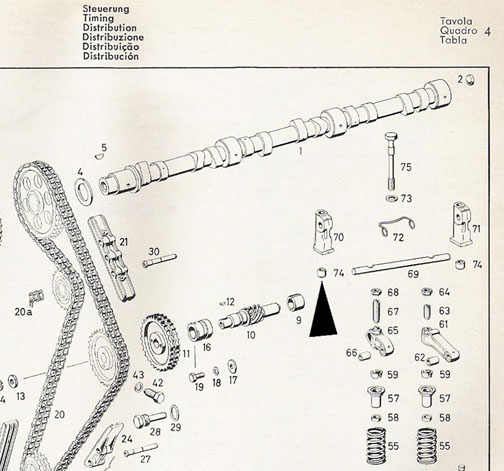
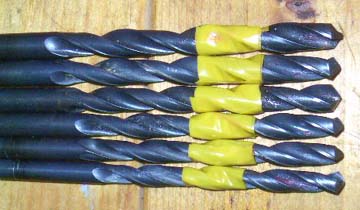
The bolt is an M10 x 1.50. That requires kit #1015 which comes with five 14mm inserts. From left to right, the kit comes with a drill bit for removing the old damaged threads, a counterbore bit to allow the insert collar to be seated properly, a tap to cut new threads for the insert, a driver to screw in the insert and the five inserts.
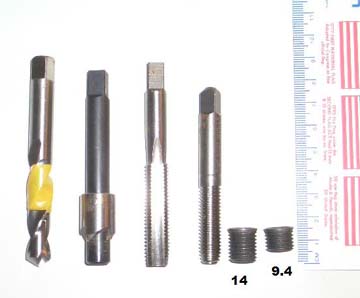
I also ordered five 9.4mm inserts, Time-sert part #10157.
The distributors listed on the Time-sert webpage were quoting about $100 for the kit. I then found Mark Taylor on eBay who was selling the same kit for $65. Service from Mark was excellent and I would highly recommend him. His eBay name is ZDMAK Tools and his website is www.zdmak.com. The extra 9.4mm inserts cost about $1.35 each.
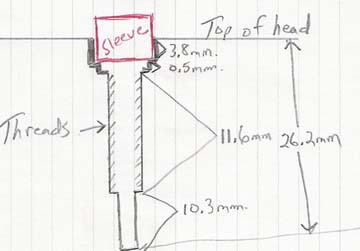
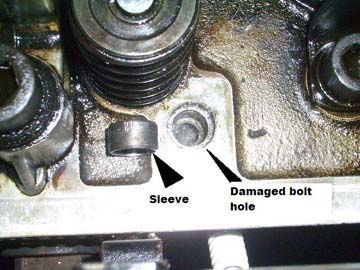
This is what the cross section of the damaged bolt hole looks like. The locating sleeve that fits in the top of the hole also fits into the rocker arm support and keeps everything in place.
I certainly wanted to be able to use this sleeve. However, I was willing to file/grind it down some in case I needed to. In order to install the Time-sert correctly, the depth of the hole must be approximately 5mm longer than the length of the insert. That means that for the 14mm insert, I would have to have a 19mm deep hole and for the 9.4mm insert I would have to have a 14.4mm hole. My thought and hope was that the insert would fit nicely on top of the little shelf that the sleeve sits on and that I would still have enough room to use the sleeve.
So I got started. First I drilled out the damaged threads. Then I had to deepen the narrower bottom portion of the hole to the depth needed for the insert. My plan was to use the 14mm insert, so I needed to have a 19mm deep hole. That meant that I would need to widen the narrow hole by about 8mm. In order to do this and not drill too deep, I enlarged the hole in stages using larger and larger drill bits until I got up to the bit that I used to remove the old threads. I put a piece of electrical tape on each drill bit at a point that would tell me when to stop drilling. I figured that was a much better plan than to drill until I saw coolant filling the hole.
I did not use the counter bore bit because the insert fit nicely into the portion of the hole where the sleeve went. Thinking that the hole was deep enough, I used the 14mm insert and installed it.
I had a problem. The insert not only stuck up too far in the hole to use the sleeve, but it also appeared to be off center. Maybe I hadn't drilled the hole deep enough. Rather than deepen the hole, I decided to try the 9.4mm insert. The 14mm insert was easily removed using an EZ Out. In went the 9.4mm insert and it looked great.
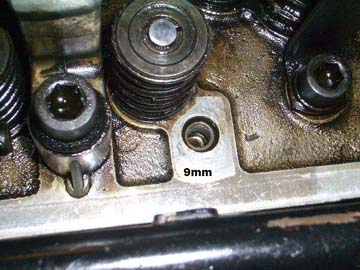
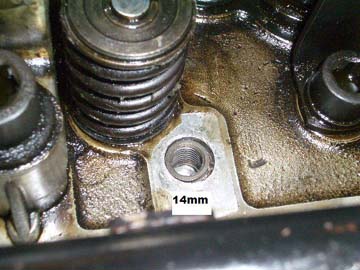
It was centered and in far enough that I could use the sleeve without making any modifications. The only thing I can guess as to why the 14mm insert didn't work was that the hole was not deep enough and the insert somehow got a little cocked in the hole once it bottomed out.
So with the insert in place, I reassembled everything and so far all appears to be working well.
Created: September 25, 2006 / Jeff Miller
© www.mbzponton.org