 |
An adjustment process including theory, technical specifications, photos, and some hints on technique.
Scott Gordon / Jeff Miller / December 24, 2001 - February 9, 2002
As the crankshaft rotates and pistons go through their cycles, the distributor acts as the brains of the operation. It precisely controls the timing of the spark. Each cylinder's spark must occur at a precise time during the rotation of the engine. The distributor is driven off an idler pulley in the timing chain, such that it rotates at half the speed of the crankshaft. The engine makes two complete revolutions in the same time that the distributor makes one 360 degree revolution.
As the distributor rotates, the lobes on its shaft displace the breaker points to open and close them. One point is stationary and the other is movable. There is a small follower made of fiber filled phenolic resin, or nylon, or Teflon, which rides the cam on the distributor shaft, opening and closing as each lobe passes by. The number of lobes is the same as the number of cylinders in your engine. Each time a lobe passes under the follower, the points separate, breaking the circuit and firing one cylinder in the engine. Finally, the distributor earns its name by sequentially distributing that spark to each cylinder in the firing order. By adjusting the distributor and points, the timing of the spark can be set precisely. This is important because if the spark is too early, pre-ignition (knocking) is the result, which can be detrimental over time. If the spark is too late, the engine makes much reduced power and will seem sluggish.
Distributor Kung FuScott Gordon / Tue Apr 29, 2008 8:39 pm International Ponton Owners Group (IPOG) forum message
Nr. 59102.
|
The degrees of distributor cam rotation during which the points remain closed is referred to as "dwell", or "dwell angle." The most accurate way to check the setting of the points is to check the dwell. Setting the points with a wide gap results in a low dwell reading and low voltage to the spark plugs. Setting the points with a narrow gap results in a high dwell reading and higher "high tension" voltage, but can also result in "point bounce" within the distributor at higher RPM levels which can result in the engine misfiring. In practice, "point bounce" does not occur too often. It may be based more in theory. It has to do with a physical limitation of the breaker arm not being able to respond to the lobe on the distributor shaft. Perhaps, with the closer gap, the tension (or spring action) in the breaker arm is lower and has lost some of its ability to follow the cam lobe. As the point gap is decreased, the engine performance increases but the points will wear prematurely. For "daily driver" vehicles, it is recommended that the points are set to the specifications outlined in the workshop manual (reference Table 1).
The proper setting for points is determined by dwell, and measuring the dwell with a meter on a running engine is much more accurate than simply measuring the static breaker point gap. However, static gap is usually reported as a starting point, so you can get an inoperable engine started.
Table 1. Static Breaker Point Gap and Dwell Angle |
||
| Mercedes-Benz Ponton models | static breaker point gap (mm) | dwell angle |
| 180, 180a, 180b, 190, 190b, 190SL | 0.4 - 0.5 | 50 +/- 3 |
| 220a, 219, 220S, 220SE | 0.3 - 0.4 | 36 +/- 2 |
While the static gap can be used as a starting point, this measurement depends on new (unpitted) points and a little luck. Once the points are gapped, then you should fine tune using the dwell adjustment.
The procedure unfortunately involves a special tool, the dwell meter (available at Sears for around $20) and a little bit of patience. On Mercedes-Benz Pontons, it is a trial and error procedure, and you should set aside about one hour to see the project through. Do the work in a nice place, get out of the garage and under a shade tree or go to the beach. You will be revving the engine, and you do not want to breathe the fumes, so go outside.
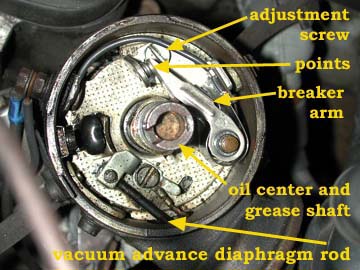
Bosch VJU 4 BR 22 distributor with cap removed. This distributor is original to the Type 180a/180b 4 cylinder sedans with the M121.923 engine
|
Photo 1.
If the cam follower on the breaker arm is worn, you might have the correct dwell angle, but the point gap will be too small. So to eliminate this, get a new set of points, install them in the distributor, and replace the condenser too. It is usually recommended to replace these two parts at the same time. Plus now is the time for routine lubrication. Take a small dab of grease and touch the cam in the distributor. Note that the distributor cam grease should be used extremely sparingly because too much may result in fouling the face of the contact points. This will lubricate the follower for the points and protect the shaft itself. Put a drop of light oil down the center of the shaft of the distributor, and another drop in the hole on the side of the distributor, after you slide back the tiny door.
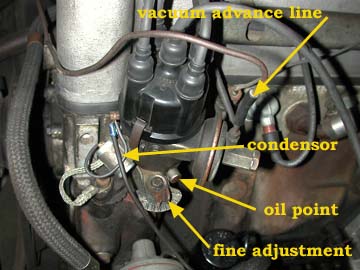 |
Photo 2.
Set the static points setting first. Use a feeler gauge if you have one, or if not, then double a matchbook cover. Put the car in top (4th) gear, and roll the car (backwards is easier) turning the engine slowly until one lobe is directly under the follower block on the breaker arm. Take pains to make sure the follower is at the center top of the cam. The maximum distance you have to roll the car between cams is about 8-12 inches. With the car in 4th gear, you may also achieve the same results by jacking up and rotating a rear wheel, or use a 27 mm (1 1/16") deep socket to turn the crankshaft pulley bolt.
Once the cam is under the follower, it is time to set the points. You can find a way to do this yourself, but you need to be able to tighten the adjustment screw such that you leave the points apart the correct amount (an amount which changes during the process). Easy, huh? OK, let's go. Try the smallest feeler gauge you have which fits the range for your car (reference Table 1 or the owner's/workshop manual). Take it out of the holder, so you are holding just that gauge. Loosen the adjustment screw and put the gauge between the points. The points should create just enough drag on the gauge so that there is a tangible amount of effort to remove the gauge. Now, here comes the delicate part of the process. Try not to upset the new gap you have set, and at the same time, tighten the adjustment screw. Then, stand up straight (do not hit the back of your head on the grille) take a deep breath and gaze out from under your shade tree. After that, roll the car (still in 4th gear) to get to the next cam lobe on the shaft to verify the new setting. When the cam follower on the breaker arm reaches the apex of the next cam lobe, insert your feeler gauge (or matchbook cover) again. Does it seem like the setting is correct? If yes, then take the car out of gear and (attempt to) start the engine. If it starts, congratulate yourself on getting the gap set close enough to start on the first try. If the engine will not start, begin the adjustment process again. If the engine is now running, you will need to check it with the dwell meter to really see how it measures up. Follow the directions that came with your dwell meter and reference Table 1 or your workshop manual for the correct dwell values for your car.
Anytime the point gap is changed, check the timing because changing the gap changes the point in the shaft's rotation in which the spark plug fires. So get out your timing light, clip it to the #1 plug wire, smear a white crayon on that thin line on the harmonic balancer, disconnect and plug (a golf tee works well) the vacuum advance hose (Photo 3) between the carb and distributor, and fire it up. Set the timing by loosening the hex (Allen) head hold down bolt at the bottom of the distributor. Then gently rotate the distributor until the timing light shows the mark where it should be on the little scale on the harmonic balancer. Tighten it down, reconnect the vacuum advance.
References
Mercedes-Benz Service Manual S-1201-000 / Models 180 to 220SE / Job 01-3/6
Glenn's Repair and Tune-up Guide / ISBN 1 869826 329 / © 1987 / for Model 180c
BTDC = Before Top Dead Center
ATDC = After Top Dead Center
Table 2. Ignition Timing Settings at Starter Speed |
||
| Model | Bosch distributor | Strobe light setting at starter speed |
| 180a / 190 | VJU 4 BR 14 VJU 4 BR 22 VJUR 4 BR 27 |
8° +/- 1° BTDC |
| 180b | VJUR 4 BR 28 | 4° +/- 1° BTDC |
| 180c | not covered in manual | 3° +/- 1° BTDC |
| 220a / 219 | VJU 6 BR 24 VJUR 6 BR 24 VJUR 6 BR 38 |
5° +/- 1° BTDC |
| 219 | VJUR 6 BR 38 | 1° +/- 1° ATDC |
| 220S | VJUR 6 BR 24 VJUR 6 BR 38 |
8° +/- 1° BTDC |
| VJU 6 BR 38 | 2° +/- 1° BTDC | |
| 220SE | VJUR 6 BR 32 | 2° +/- 1° BTDC |
| 190SL | VJUR 4 BR 11 VJ 4 BR 12 |
1° +/- 1° BTDC |
| VJ 4 BR 11 VJR 4 BR 21 |
9° +/- 1° BTDC | |
Vacuum advance is a simple system which consists of the following components: A hose which goes from the carburetor (manifold) to a sealed diaphragm that is mounted on the side of the distributor. The diaphragm has a rod (Photo 1) that is connected to a plate in the distributor. When the manifold vacuum is high (at idle speeds), it pulls the plate and advances the timing.
Basically, when idling, the engine needs a little more time to burn the fuel. So, the spark must occur a little earlier. The vacuum developed by the engine is a fair indicator of the load on the engine. More vacuum is developed at low and mid engine load conditions. Less vacuum is developed under high load. The load is defined here as the work that the engine is doing, combined with the gas pedal position. It is an instantaneous thing, and going up a hill is more load, and throttle wide open is more load, and the two items together is max load. It is different than RPM. It is difficult to test this in the driveway, and you need a VERY sensitive vacuum gauge to do so. Look for one calibrated in inches of water rather than inches of mercury. WITH THE ENGINE STOPPED, you can test this mechanism by disconnecting the line at the manifold (or carburetor). Remove the distributor cap. Create a vacuum with a hand operated vacuum pump. The plate in the distributor will move if the system is working correctly.
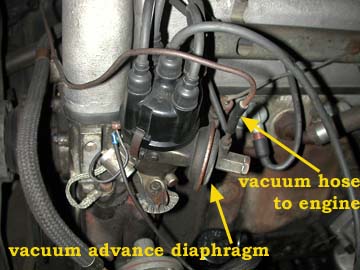 |
Photo 3.
Typically, vacuum advance contributes MUCH less advance (measured in degrees) than the centrifugal mechanism of the distributor, which advances the spark due to engine RPM. The vacuum advance just "polishes the apple."
Reference Photo 4: Up to chassis # 7506729 on the Type W121 190 sedan, and up to chassis # 7501979 on the Type W105 219 sedan, and up to chassis # 5704707 on the Type W180 220S, a cable was used for adjusting the distributor. As fuel quality consistently improved, there was less need for the ability to adjust the distributor from the driver's seat.
Reference Photo 5: The dashboard control switch for the distributor adjustment cable is shown in the Type 220S picture parts catalogue as being similar to the headlight switch.
After the distributor adjustment cable was discontinued, at the base of the distributor, you will find a fine adjustment lever which has the letter "S" at one end of the scale and the letter "F" at the other. The "S" stands for spät (retard), while the "F" stands for früh (advance). The original purpose of this lever was to adjust the timing in case you got a bad batch of gasoline. The manual says to return the lever to the fully advanced ("F") position as soon as possible after finding a good source of fuel. The engine timing should be adjusted by turning the whole distributor (loosen the hex head bolt at the base), leaving the thumb screw of the fine adjustment lever fixed against the fully advanced ("F") stop. There is no reason not to use the fine adjustment lever to make small adjustments in the timing, but that was not its original intended use.
Photos 1, 2, 3: Jeff Miller's 1957 Mercedes-Benz Type W121 190 sedan with a 121.923 gasoline engine. The 121.923 (1,897cc) engine is original to the Mercedes-Benz Type W120 180a and 180b sedans. Source of Photo 4: unknown.
 |
Photo 4.
A distributor adjustment cable on a 1956 Type W180 220S sedan. The cable was discontinued in 1957. It was superseded by a fine adjustment lever at the distributor itself (Reference Photo 2).
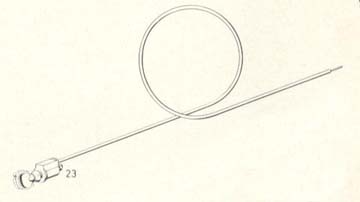 |
Photo 5.
According to the Type 220S picture parts catalogue, the dashboard switch for the distributor adjustment cable looks similar to the headlight switch.
Revision History
March 29, 2003: Updates regarding the distributor adjustment cable thanks to Jack Kotrba, Craig Semple, Len Sokoloff as well as other members of the International Ponton Owners Group (IPOG)
- April 30, 2008: Added "Distributor Kung Fu"