This article originally appeared on the International 190SL Group web page in January 2001. It has been edited and is used here with permission. - Jeff Miller / December 27, 2001.
Want to REALLY help the performance of your W121 190SL roadster? There is no reason why this would not work on Ponton sedans, coupés and cabriolets that I know of. There may be some modifications because of a vacuum advance. The 190SL has centrifugal advance.
For years, I have been fighting a midrange RPM balk and missing. At Jim Villers' suggestion, I decided to try this out. I bought a Crane Cams "Fireball" kit directly from Crane Cams (www.cranecams.com). It was delivered within a week, and the total was less than $100. We also put one in a friend's MGC, and while he was not complaining about the performance beforehand (it has a 3 liter in-line 6 in that roller skate of a car), he was awed by the performance afterward. Now, if only his brakes worked.
Read the instructions, even though I will outline most of what you need to do. It looks a lot more complex than it is, because the instruction book must take into account all of the different types of ignitions out there. While this should only take an hour or two, allow more than that in case you run into problems.
THIS ENTIRE PROCESS IS AT YOUR OWN RISK. DO NOT BLAME ME OR SUE ME IF YOU FOLLOW MY INSTRUCTIONS AND NOTHING WORKS!!
With that said, this is a fairly easy DIY project!
Remove the negative ground from your battery. Put the transmission in 4th gear. Do NOT engage the parking brake. Block all of the wheels, front and back, except the left rear. Jack up the left rear of the vehicle until the tire is off of the ground. Note: if you are not SURE that your jack ports are rust free, use a floor jack. If you do not have one, you should. They are cheap, so go get one from Wally World (Walmart). Jacking any Mercedes with the factory jack has some hazards, made even worse on a 40 year old car.
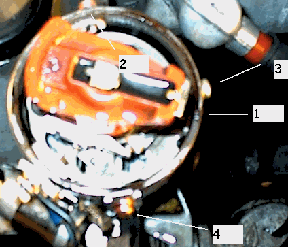
Remove the distributor cap. This is a good time to replace wires and plugs too. Get some quick help from an assistant. This is one of those times when having children pays. If you have decided to replace the plugs, remove them, and leave them out for a bit. With the transmission in 4th gear, have your assistant rotate the tire in the direction of normal forward tire rotation. Turn it until the center of the rotor points to the 1st cylinder mark on the distributor (#1 in the picture - it is on the rim of the distributor, right under where the #1 spark plug wire would be.
Remove the rotor. USING A MAGENETIZED SCREWDRIVER, Unscrew the points, condenser and wires to the points and remove. Dropping loose screws down into the distributor is not recommended. If you do not have a magnetized screwdriver, run a screwdriver across a strong magnet. I keep an old speaker on my workbench to magnetize/demagnetize screwdrivers (run it back across to demagnetize). Remove the 3 Phillips head screws holding the base of the points in the distributor (2,3 and 4), remove the base.
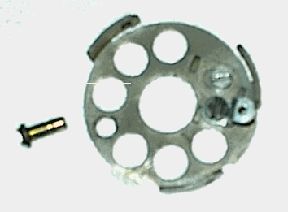
Remove the points post by grinding the peen off of the bottom of the post, and then punch it free. This way if you ever want to go back to a points system, you have the parts. Install the smaller foot of the 2 supplied, as pictured above, using the screw you removed with the points. It goes over the 2 ridges in the base. Re-install the base in the distributor.
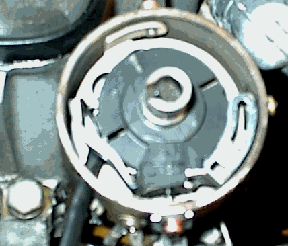
Because of the tight fit, you will need to fit the optical trigger at the same time as the disk. Fit the arm on the optical trigger. If yours was like mine, you will need to grind down part of the metal on the arm to get it to fit correctly to the optical trigger. I really thought it should fit better than that. Choose the disk with the 4 slots in it, numbered 219. You will then need to put the disk over the distributor post and fit the optical trigger at the same time. I had to trim a small amount (about 1/16") off of the outside of the disk to get it to fit. You will have to push hard to get the disk over the distributor (and it is a bear to get back off if you have to remove it). Use a deep well socket to push down on it evenly, which will keep you from bending or breaking the disk. The disk specifically for Bosch distributors (220) did not fit mine. You want the disk to be centered in the optical trigger so it does not hit either the LED or the receptor lens. Adjust the height of the optical trigger with the screw attaching the arm to it. It is a bit of trial and error to get it right. The optical trigger should be positioned so that left side of the slot in the disk is in line with the LED. See picture (sorry for the quality, new camera).
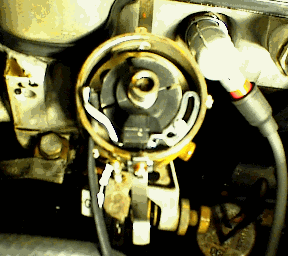
Run the wires from the optical trigger out of the distributor, and hook them up to the "Fireball" per the instructions. Make sure you get the 3 wires in the proper order. Hook up the coil +, coil -, and ground as instructed. They are labeled specifically for Bosch coils. I used wire braid to the ground on the distributor for attaching the ground wire.
Now for the moment of truth. Hook up the battery and turn the ignition on DO NOT CRANK THE STARTER please. If you do, you will have to re-align to the distributor mark again (I did, sometimes I am such an idiot). Adjust the optical trigger as specified in the instructions, so that the LED test light on the Fireball box just comes on from the left side of the slot in the disk. Tighten everything down. If your test LED does not come on when the disk slot is open, recheck your wiring. Put the rotor on (I forgot that and wondered why it did not start - again, what an idiot!) and clamp the distributor down. Fire it up!! Check your timing with a timing light. I run mine between 35-40 degrees at 3000 RPM, per the manual. WATCH THAT FAN!!
Often (as you probably already know), grime tends to hide your engine's timing marks and a lot of people add chalk, paint or nail polish to the harmonic balancer to add contrast between the marks and the pulley surface. With the engine stopped, you can highlight the timing marks themselves, making them lighter than the pulley surface, or you can highlight the entire pulley surface, making the marks appear darker. On a cool, non-running engine, I mark mine by rubbing chalk over the timing marks, then I wipe the chalk off the surface. The remaining white chalk in the timing marks really stands out.
Mount the Fireball in a convenient place. I put mine above the heater duct after removing the Fireball sticker. Clean up the wires with wire ties. I will eventually give them a coat of paint to make them less obvious.
Take if for a spin, hopefully, everything runs great! No more points, points gap or dwell to screw with.