Editor's Note: Exact copies of this article (including images) have been found posted around the internet. The plagiarized copies have been modified slightly to apply to marques other than Mercedes-Benz. George Murphy verified he is the original author of the content found on this page. - Jeff Miller / December 17, 2004
Crane XR-700 Ignition System Installation
Of all the systems that enable your older Mercedes-Benz to be kept on the road, few are more trouble-prone than the pre-1975 transistorized ignition system. The main culprits are usually the contact breaker points and condenser. The usual scenarios are: 1: the point arm rubbing block eventually wears down, reducing the gap and 2: the condenser shorts out and takes the points with it by frying the contacts and the (expensive) switching unit.
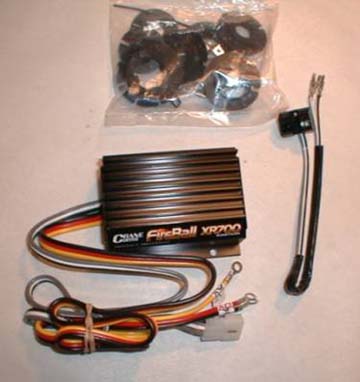
The Crane XR-700 uses non-mechanical means to trigger the ignition coil. The points and condenser are replaced by an optical pick-up and a "shutter" wheel attached to the distributor shaft. The system uses a light emitting diode (LED), shining a beam of light at a photocell immediately opposite.Point ignition systems have been around since the dawn of the automobile and so have failures of its basic components - the points and condenser. Mercedes-Benz recognized these shortcomings of the point type ignition systems and in the late 1960s used a "hybrid" electronic ignition system. Unfortunately, these early Bosch systems only worked well on new engines. Once aging set in - 50,000 miles or so - distributor shaft wear allowed oil mist to deposit on the points. The distributor shaft can wear to the extent that the dwell cannot be accurately set and oil mist can migrate up the shaft to deposit on the points - degrading ignition performance.
The shutter wheel has the same number of evenly spaced slots as engine cylinders, and is fixed to the distributor shaft by self-centering spring clip. As the wheel rotates, the slots pass over the photocell, allowing it to "see" the LED, and in conjunction with the ignition module, signal the ignition coil to fire. There are no points to wear out, no condenser to short out and no expensive transistor switching unit! Also, if the distributor shaft is worn, it will have negligible effect, as the shutter wheel is still wide enough to compensate, regardless of the shaft's orbit. Because there are no mechanical parts to wear out with the Crane XR-700 installed, you will never again have to adjust your timing or dwell!
In 85,000 miles, my 1971 250 sedan timing had not changed one degree. The added bonus is your future tune-ups will take less time and expense.
Installation is easy on a Mercedes-Benz - simply order an XR-700 unit - it comes with 4, 6, and 8 cylinder shutters. After choosing the appropriate shutter for your car, the first step is to find a location in the engine compartment to place the Crane ignition module. The leads are sufficiently long to allow mounting anywhere in the engine compartment, so even Concours fanatics can install an XR-700 and mount it out of plain sight. I usually mount it where the old transistor switching unit used to reside. The kit provides self-tapping screws in the parts bag for this task, although pre-existing holes may be found.
To install the optical pick-up, first set the engine timing mark on Top Dead Center (TDC) for cylinder number one. If in doubt as how to achieve this, consult your workshop manual. Now follow the spark plug wire from #1 cylinder back to the cap, and mark both the cap and the side of the distributor body with a felt tip pen. On earlier Bosch distributors such as on M130 engines, it may be easier to install the optical pick-up in the distributor if you first remove the distributor from the engine.
Remove the points and condenser and wires to the transistor switching unit. Next install the optical pick-up with its adjusting arm and mounting foot on the breaker plate of the distributor, using the screws that originally mounted the points.
Now fit the shutter wheel to the distributor shaft and slide the optical pick-up into place. Don't tighten all the screws completely until you reinstall the distributor, and make sure that there is plenty of clearance between the shutter wheel, pick-up and rotor arm, so that they don't rub anywhere.
Turn the distributor body so the rotor arm points at the line you marked on the body, and adjust the mounting foot so that you can slide the pick-up across the nearest slot in the shutter wheel. Run the gray cable out of the distributor body through the original grommet on the distributor. You will find that the cable will just fit in the hole and with a little silicone gasket goo; you can affect a weather-tight seal.
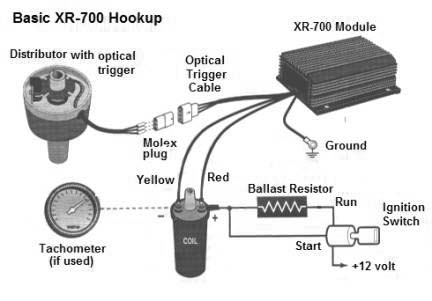
The next step is to connect the wires as shown on the appropriate Crane diagram. The wires are color-coded and labeled as to the terminals they connect - practically foolproof.
Be sure to leave enough extra cable inside the distributor body to allow movement of the breaker plate for the vacuum advance. A small tie-wrap is included in the parts bag for this purpose. After routing the cable out of the distributor, you can install the Molex plug, taking care to match the colors to the other half of the plug.
If you have removed your distributor, now is the time to reinstall it in the engine. Slacken the clamp bolt and rotate the distributor body until the rotor points to the line you marked earlier. Connect the optical pick-up to the ignition module with the Molex plug.
Next, remove the high tension cable from the distributor cap and tape it somewhere where the end of it is about 3/8" from a good ground.
Switch on the ignition and make final adjustments to the optical pick-up. This is done by sliding the pick-up toward the approaching slot. As the pick-up passes the slot, the LED will "see" the photocell and fire the ignition coil, causing a spark to jump from the high tension lead to ground. Adjust the pick-up until the coil fires no further, and then tighten the screws to secure it. You may want to try a couple of times until you are comfortable with its final position.
After the final adjustments of the optical pick-up make sure that nothing rubs and that the distributor cap fits without interference.
Now we can set the timing to Mercedes-Benz specifications with a timing light. From your engine manual, find the amount of spark advance specified for high RPM operation. For example, if your ignition is specified to advance to say, 30 degrees at 3200 rpm, then adjust the timing to show 30 degrees advance with the engine at 3200 RPM. In this manner, your engine timing is optimum for operating engine RPMs. Never mind what the idle advance is - you don't drive the car at idle RPMs.
It is a good idea to check the timing, say, once a year, to see if there is any change due to timing chain wear or wear in any other components.
While we are in the neighborhood of the ignition system, it is a good idea to examine the rest of the components. On a 30-50 year old Mercedes-Benz with original components, the distributor cap, rotor and ignition wires will need replacing. Last but not least, you will need a set of new and properly gapped spark plugs - DO NOT USE PLATINUM SPARK PLUGS! Mercedes-Benz specifically advises against these for all engines up into the 1990s. The correct spark plug gap is 0.8 mm for all engines of this vintage.
Crane XR-700 breakerless ignitions are available from:
Performance Analysis Co.
1345 Oak Ridge Turnpike, Suite 258
Oak Ridge, TN 37830
865-482-9175