|
|
 |
Ray Ilich / 1997
|
|
|
Heater Box Removal
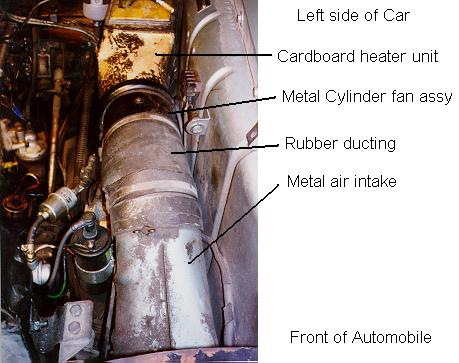
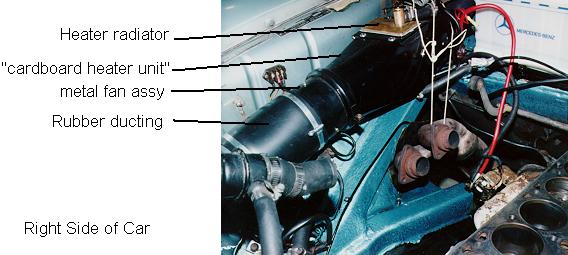
1) Remove the rubber ducting and fan assembly forward of the cardboard heater assy. Don't forget to unscrew the wire connections.
2) Remove the sheet metal partition located forward of the battery (for right side) or forward of the fuse box (on the left side).
3) Locate and remove the three Phillips screws located at the base of the aft end of the cardboard heater assy. From the passenger compartment, locate and remove the 10mm hex bolt securing the heater box. This is located in the vicinity of the floor heater vent door in the passenger compartment. You'll have to lay down on the floor to see this. (Did you know this existed?)
4) In the passenger compartment, remove the heater control levers by placing a screwdriver under the curved edge and pulling. Open the glove box door, (small glove box on driver's side), and remove the two Phillips screws which secure the wood face plate for the heater control levers. Remove the wood face plate.
5) Disconnect the control wires from the lever unit in the passenger cabin. If you plan to reuse these wires straighten the ends with a pair of pliers, so they will (in step 9 pull through the sheath.
6) Disconnect the control wires from the heater unit, by first removing the C-Clip from the flap and valve control arms, then slide the coiled control wires off the flap and valve control arms. Note: If you plan to install new control wires, you may cut these wires aft of the coiled end instead of disassembling at this point.
7) Drain about a gallon of coolant from the radiator by opening the drain valve at the base of the radiator.
8) Loosen the clamps for the heater hoses at the metal heater lines on the firewall. Remove the 2 rubber heater hoses from the metal heater lines on the firewall. leaving them attached to the heater core.
The Cardboard Heater assembly should be free and able to be removed.
9) Remove the cardboard heater assembly and its component heater core.
10) Pull the heater control wires forward out of their sheath.
 |
Installation
11) Use steel wool to clean and polish the entire length of the cables.
11a) (New Cables) Lay the old and new cables side by side and apply a dab of white paint on the new cable at the length where the clamp bolt holds the cable in the control lever assembly, about 2 feet away from the coiled end. Allow paint to dry.
12) Using thumb and index finger, liberally apply multipurpose grease to the cable from the coil to the dab of paint.
13) From the engine compartment, insert the 3 control cables into their respective wire sheath. With new long wires, be sure to thread the end through the clamp bolt in the control lever clamp bolts located in the passenger compartment. Do not tighten the clamp bolts at this time.
14) Position the cardboard heater unit, (with component heater core) in the engine compartment about 3 inches forward of its correct position. This will give room for you to perform the next step.
15) Slide the coiled end of the control cables over the heater flap control arms and reinstall the C-Clips. You may need to remove the outer control arm (which controls the floor flap), position the wire coil and then reattach the outer arm. Be sure it is positioned correctly. Don't worry about the cable for the heater core valve at this time.
16) Carefully move the cardboard heater unit aft into its correct position. Connect the 2" heater ducting to the heater unit. Connect the rubber heater hoses to the metal heater lines on the firewall.
17) Reinstall the 3) Phillips screws and 1) 10mm bolt which secure the heater unit.
18) Slide the coiled end of the control cable over the heater core valve and reinstall the C-Clip.
19) In the passenger compartment, adjust the control lever clamp bolts to the position indicated by the white dab of paint. Temporarily snug the clamp bolts.
20) Verify the control levers operate the heater core valve, and heater flaps to their fullest extent and complete range.
21) Tighten the clamp bolts
22) Cut the wire about 1/2" aft of the clamp bolts.
23) Reinstall the wood face plate and chromed levers.
24) Secure clamps on heater hoses.
25) Refill Radiator
26) Reinstall sheet metal partition
27) Reinstall rubber ducting and fan assy. Reconnect fan wires.