Chris Greene / greene1634@yahoo.com / White Bear Lake, Minnesota / 1959 220S sedan
Preamble
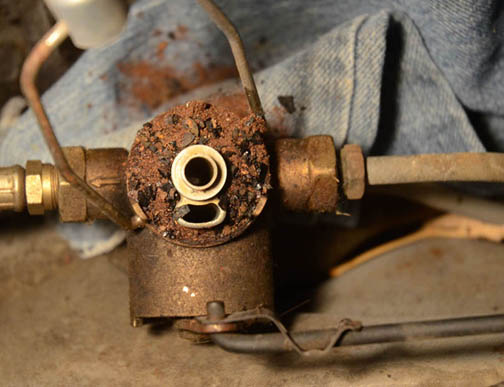
Fuel delivery problems in our Pontons are common, and can range from minor annoyances to major start-up and driveability problems. I have owned a 1959 220S for a few months, and know the previous owner took good care of it. However, I noticed some troubles starting the car, and occasional sputtering and even stalling when it was facing uphill. They were never enough to do much about, and I didn't (aside from keeping good notes on when and how often they happened) make any plans to go through the fuel system. One day, I took a look at the fuel filter. This is easy to access; the fuel filter is integrated with the fuel reserve switch. Just loosen the wing nut on top, move the wire retainer to the side, and lift the housing off. Figure 1 shows what I saw.
Figure 1. Fuel filter crud.
The fuel reserve switch
(a.k.a "fuel transfer valve") and
dashboard connecting rod are visible at the bottom of the photo.
Time for a clean-up and new filter. First off, be aware that there are several types of Ponton fuel filter/reserve switch units. Here is a photo of three of them. Mine is like the one at the right in that photo. There are two gaskets near the fuel filter – a small one between the filter and the main body of the reserve switch, and a larger one between the cover and the main body of the reserve switch. The wire retainer and a spring inside the top of the filter housing keep everything snug. There is also a cork gasket inside the reserve switch unit.
I ordered all three of these gaskets from my local Mercedes-Benz dealer. I'm sure the Classic Center also has them. The little gasket is part No. 000 477 29 80. The big gasket is No. 000 477 28 80. The cork gasket is No. 000 477 10 60. I also ordered a fuel filter (part No. 000 477 50 15). My new filter was just a little bigger than the old one, but the inner hole was the same size.
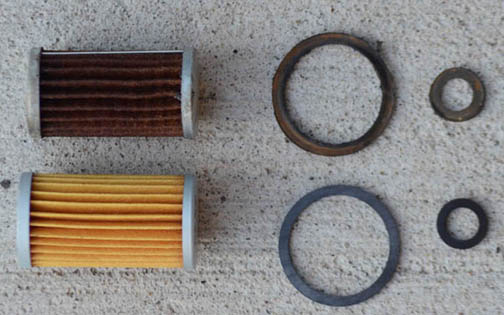
Figure 2. Old and new filter and gaskets.
I decided to wait to replace the cork gasket, because (1) I was having too much fun driving the car to take it off the road, and (2) I couldn't loosen the nut that attaches the lower fuel line to the reserve switch unit. Then, after an unpleasant experience in which the car almost left me stranded climbing a 10 percent grade, I decided it was time.
Removal
For the stuck fuel line connection, the tool that worked for me was a Vise-Grip 7LW wrench. Now, I had always thought vise-grips were what you used when you had no other choice, and didn't care if the tool ruined whatever unfortunate nut you were using it on. But this particular tool is designed to make a tight grip, vise-grip-style, on the flat surfaces of a nut. This tool, combined with lots of penetrant, got the fuel line out. Later, I used smaller version of the same tool on my front flexible brake lines. When my flare nut wrench failed and was starting to round the nut, the vise-grip 4LW wrench worked perfectly.
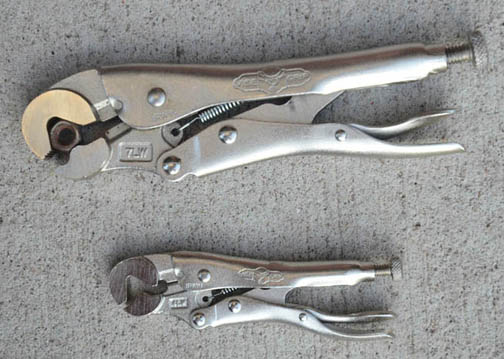
Figure 3. Vise-grips: Not just for chewing up small parts.
In addition to the three fuel lines, you must disconnect the rod that goes back to the reserve switch lever on the dashboard. It is held on the reserve switch by a metal clip. Also, remove the bolt that holds the unit to the inside of the engine bay.
Disassembly
First thing: do not take the obvious route and loosen the nut. There's no need to mess with that. There is a retaining ring that sits in a groove on the inner wall of the housing. Pry that out and remove the handle assembly.
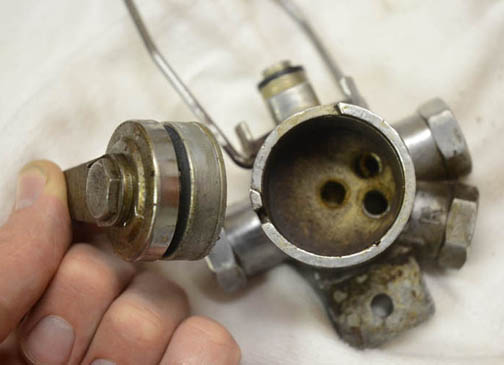
Figure 4. Handle removal.
Remove the old cork gasket. I used a pointy hook to pull it out. It came out most of the way in one piece, but the thin parts near the holes broke as it emerged from the housing.
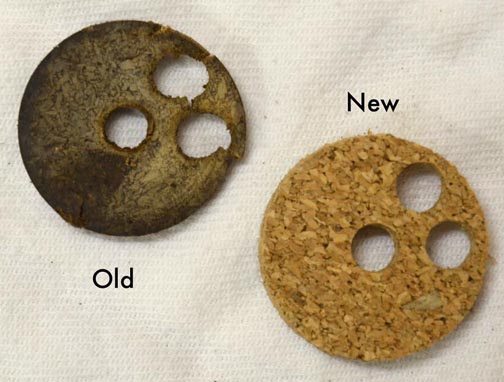
Figure 5. Old and new cork gaskets.
Cleaning
The new cork gasket was a little thicker than the old one. The three holes were all drilled/punched at a slight angle away from "straight through." I don't know if this was by design or not.With everything out of the switch unit, I cleaned it with carb cleaner and a toothbrush. The handle assembly had some gunk on the inside face that contacts the cork gasket. I cleaned this by placing a piece of 1000-grit sandpaper on a sheet of glass and rubbing the switch handle unit on the sandpaper. I soaked the switch unit in mineral spirits overnight and let it dry. Here are all the parts after cleaning. The fuel filter is a few weeks old.
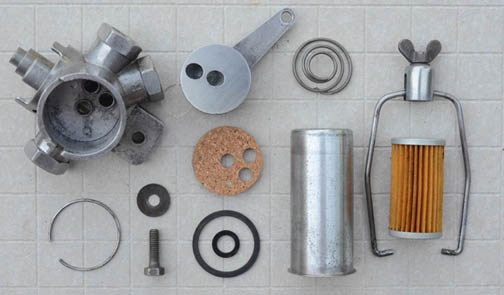
Figure 6. All parts from the fuel reserve switch.
Reassembly
Now, time to reassemble. Be careful installing the new cork gasket; it fits snugly and, being cork, doesn't react well to being bent. As it goes in, the holes must align with the raised metal walls that surround each of the three holes on the unit. Once I got mine started, I used the handle assembly to press the gasket in evenly. I hit the three holes just right, but a couple of little crumbs of cork were cut off by the "walls," probably because the holes were not drilled perfectly straight through the gasket. To ensure the gasket was all the way in, I put the whole unit (with the handle) in a metal C-clamp and tightened it (see Figure 8). After pressing it in, the cork sits just a little above the level of the raised metal walls. Before closing the unit up, compare the locations of the holes on the reserve switch unit to the holes on the handle assembly. The two extreme positions of the switch should connect one of the incoming lines to the center, and then the other. If you did not take apart the handle assembly, everything should line up. Blowing air through the unit should help to verify this. To reassemble, you need to compress the handle assembly into the unit so that the groove that accepts the snap ring is exposed. There are many ways to do this, and Mercedes-Benz probably had a special tool for it. As for me, it just happened that the day I did this job, my four-year-old son finished a course of antibiotics. The cap to his medicine bottle was the right size to fit nicely over the handle assembly.

Figure 7. This tool does not have a M-B part number. Consult a pharmacist or check your recycle bin.
With a little modification to keep the cap clear of the handle, it fit perfectly. Even better, it did not fit inside the snap ring, so by putting everything in a clamp and tightening, it compressed the handle assembly AND installed the snap ring in one move.
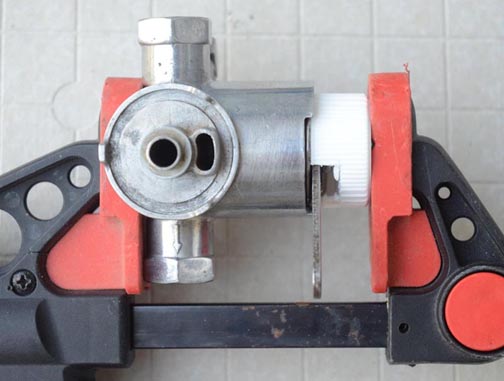
Figure 8. Resetting the handle with a C-clamp, and a modified bottle cap.
Now all that's needed is to reinstall the unit. I found that it was easy to get the angle wrong when installing the lower fuel line. Before I knew it, I had cut across the first two female threads on the reserve switch unit. So, before I got myself into more trouble I backed the nut out and used a properly sized thread tap (M14 x 1.5) to clear the way. But I'm sure this won't happen when YOU do it. Will this fix my fuel problem? Only time will tell. At the very least, I'll know that one part of the fuel system is freshly rebuilt.
Credits
Created: October 15, 2013 / Jeff Miller
© www.mbzponton.org