by Douglas P. Broome / douglas.broome@verizon.net / March 17, 2003
Introduction
The fuel delivery system in my 1959 Mercedes-Benz Type 220S cabriolet was posing starting problems. Would refitting an original lever-type, priming fuel pump help? If so, how and why? I chose, as is my wont, to research the matter to death and beyond and write up the results for "Ponton Posterity."What was Happening?
My car was exhibiting the typical hard-starting problem reported by many Mercedes-Benz Ponton owners. These engines, after sitting unused for a few days, can be hard to start. Much cursing and cranking were required - the latter putting the starter and battery at risk, the former occasioning domestic intranquillity.
How Was I Getting Around This?
"Fixes" included pouring some gasoline or squirting some starting spray down the carburetor throats. Then crank the car far more than seems healthy. The starting fluid gambit is fraught with danger if you spray in too much. In my case, out of frustration, I stupidly squirted in several spritzes. When I tried to start the car, flames shot out of the carburetor throats. The excess starting fluid, and perhaps some gasoline, burned a short while. I stared for a moment, transfixed, then ran for the fire extinguisher, fearing that the entire fuel system might explode (along with my house and pricey Mercedes-Benz cabriolet!). Before I could aim the fire extinguisher, the flame died. Pure luck! I swore off starting spray.
OK, What Next?
The hard-starting problem remained. There had to be a better way; that is, to "correct" the problem, not just "fix" it. I verified that the primary and secondary electrical systems were set to specifications. I believed that, in general, the carburetor functioned decently because after the engine starts, the car runs very nicely warm and cold, at idle or at speed. There was no faltering under load. The non-original replacement pump on my 1959 Mercedes-Benz Type 220S cabriolet seemed to be working just fine, at least when the car was running at speed and at idle.
Previously I had cleaned out the housing of the fuel reserve device and renewed the cork gasket. Sometimes a hardened or disintegrating gasket can thwart easy starting. Some, but not all, Pontons have this feature. Mine does. That job produced no improvement in my case.
In a private communication I received some explanation that is so cogently phrased that I quote it. Noting that the carburetor bowls are probably dry,
"[r]e-start cranking time becomes a function of how quickly the engine's fuel delivery and starting systems, working together, can add enough fresh fuel to the carburetor fuel bowl(s) to allow the engine to start ... If either the fuel delivery system or the starting system is not functioning properly, the cranking time will be lengthened (well beyond 10 seconds). That is why the fuel pump output test is so great." 1
Therefore, I checked if the non-priming fuel pump that was presently installed produced sufficient fuel. I did not follow exactly the service manual's testing instructions. Once I got the car started and thus knew that the fuel delivery system was basically working, I stopped the car and disconnected the primary wire at the distributor so the car would not fire. Next I detached the fuel line from the outlet port of the pump. Then I put one end of a flexible tube over that port and the other end in a container. I "turned over" the engine and directed the pump's output into the container. I got a good spurt, quantity, and flow of fuel. Imprecise, admittedly, this test allowed me to look elsewhere for the time being.
Some important additional considerations remain. Except under heavy load at wide-open throttle, an engine needs much less fuel than the fuel delivery system is designed to provide. AC-type fuel pumps, like those on our Pontons, have large operating redundancies. It is, therefore, not uncommon for suction leaks and worn parts that decrease the fuel delivery rate to go undetected until starting or hill-climbing problems are noted. Conditions that can cause decreased fuel delivery rates include: (1) worn/defective fuel pumps (so they do not pump as well as they are supposed to), (2) cracked hoses and corroded fuel lines (that not only make the pump draw some air instead of 100-percent liquid gasoline into its inlet port but may also allow the pump to lose its prime during extended shutoff periods), and (3) pump-driving parts inside the engine that are worn (such that they no longer require the pump to make full strokes).
The Analysis
After much consultation with Ponton experts and aficionados, I concluded that the fundamental problem was in the design of at least some models of the Solex carburetors that Mercedes-Benz put on carbureted vehicles of the period. 2 Evaporation from the float bowls after a period of time left no fuel in the carburetors for starting. Apparently fuel also drained down the fuel line and perhaps past the fuel pump valves towards the tank. Pumps could lose their prime as well. Maybe design steps related to the uneven quality of fuel in Europe at the time of design contributed to the evaporation. I do not know.
I further came to the conclusion that Mercedes doubtless knew of this fuel evaporation from the Solex carburetors as an inherent problem, at least during the Ponton era. Originally all Ponton carbureted models were fitted with DVG (Deutsche Vergaser Gesellschaft) pumps with a priming lever. These same pumps appeared at least as early as mid-1949 when the transitional Mercedes Type 170S began production. 3
Additionally, the accelerator pump diaphragm and rubberized gasket and other carburetor gaskets in the old carburetors could well exacerbate the problem of too rapid evaporation from the float bowls. I learned from other sources that this is a common problem for many old cars, be they of American or European origin, in part because of modern fuel composition and in part because of aged/hardened/leaky seals and gaskets. 4 In a private communication I received the following explanation:
"Since [sometime in the 1990s], we have been forced to use "ReFormulated Gasoline" (RFG). RFG disappears from carburetor bowls surprisingly quickly after an engine is shut off ... [including in all 1959 Mercedes-Benz Type 220S]. How does the RFG disappear? Mostly through the bowl vents, but percolation, [heat]-soak overflow, and carburetor leakage (both internal and external) may also be involved, depending in the individual engine. The amount of RFG that disappears from a carburetor fuel bowl depends on another group of variables, including time elapsed since engine shutoff, temperature of the engine, rate of leakage from the carburetor, [etc]... The fact that, after engine shutoff, carburetor bowls containing RFG will lose fuel (and given enough time will go completely dry) is a constant we just have to live with. 5
What to Do?
Many old car owners with original mechanical pumps bypass the problem by installing electric fuel pumps. This a "fix," a viable "work-around." Electric pumps operate either permanently or on demand at start-up time. 6 The paramount safety consideration is to ensure they cease functioning automatically in case of an accident.
A fundamental solution to the hard-starting-when-cold problem, if one would work, was preferable to me. I concluded that most important, first correction would be to fit an original-type fuel pump with the priming lever. For reasons of price and curiosity, I elected to rebuild a defective pump, not to buy a new or professionally rebuilt one. I had a carcass. I needed a rebuilding kit, something NOS (new old stock), I initially (wrongly) supposed. Later I may overhaul the carburetor. An
electric pump would be my last resort.
First, an Alert!
Before discussing rebuilding further, however, an alert is warranted. Be absolutely certain that the main diaphragm is of recent manufacture. NOS is anathema when it comes to fuel pumps and diaphragms. The rubberized fabric will age and harden in prolonged storage, losing its flexibility. Eventually the stresses it must take in use will lead to its early failure. NOS neoprene diaphragm material and other early synthetic rubber materials will not hold up to modern fuels.
Diaphragms must be fresh and newly manufactured of fabric-reinforced Buna-N Nitrile rubber, the only correct material for use with today's gasoline. Skinned Knuckles, August 2002, pp 13 contains an authoritative discussion of this requirement. See: www.skinnedknuckles.com.
The Search
My search for rebuilding kits turned up considerable information. Before discussing the kits, though, I touch briefly on the availability of complete pumps.
Complete Pumps and Professional Rebuilds
Mercedes currently supplies new original-type, priming-lever pumps under part number 000-091-91-01. I do not know the current manufacturer. It may be Pierburg. 7 I found one vendor listing a Pierburg 7.10284.5 for the Pontons. www.ruddies-berlin.de/index2.htm. The picture looks exactly like the original DVG pump, right down to the brass vents. As of this writing the Mercedes list price is $192. Inquire of your favorite purveyors for possible discounts. I found them for about $150. At least one vendor sells already-rebuilt complete pumps for $129. See: www.190slparts.com. Professional rebuilds of your own pump cost $65-75 including parts.
Rebuild Kits ("short")
Alternatively, you can -indeed should- do the job yourself. It is hardly rocket science. Rebuilding kits are readily available from a variety of sources, not only Mercedes. I suspect that the kit suppliers are essentially assemblers using generic parts from standard industry manufacturing sources. 8 One reportedly fabricates his own parts.
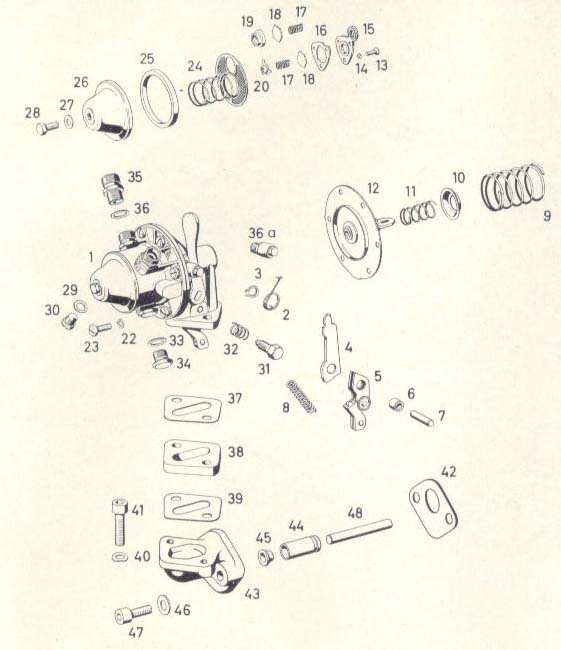
Figure 1. Illustrated parts diagram of the pump we are discussing
Mercedes provides the rebuilding kit as part number 000-586-00-09. I do not know who puts it together for them. Current list price in the United States is $49. The kit includes the following parts, keyed to Figure 1.
Mercedes-Benz Fuel Pump
|
||
|
Quantity |
Description |
Figure 1 |
|
1 |
diaphragm assembly |
12 |
|
2 |
valve springs |
17 |
|
2 |
valve plates |
18 |
|
1 |
gasket |
16 |
|
1 |
seal ring/gasket |
25 |
|
1 |
seal ring |
27 |
|
1 |
strainer |
24 |
|
2 |
countersunk screws |
13 |
|
3 |
lens head screws |
23 |
|
3 |
lock washers |
22 |
Comparing the contents of the Mercedes kit with what one finds on the pump being rebuilt reveals certain anomalies. First, figures 22 and 23 require six of each, so you must recycle three from the pump being rebuilt. Second, figure 24 indicates a spring attached to the strainer, but the kit supplies the strainer without the spring. One must carefully separate the spring from the strainer on the old pump and reuse it. 9 Third, figure 13 requires three of each as found on the pump, so you must reuse one of the originals. Who knows why the kits are oddly incomplete, but that is the way they are intended to, and do, come. I checked. Curious.
The Mercedes kits do not include the identical gaskets, figures 37 and 39, on each side of the spacer, figure 38. Their Mercedes number is 181-091-00-80; list price $0.70. You will need these.
Probably in rebuilding the pump you will decide to remove the mounting bracket, figure 43, from the car when you remove the pump. That means you will need to obtain the gasket abutting the engine, figure 42. For the Type 219 and 220S that gasket is Mercedes number 180-091-01-80 at $2.40 current Mercedes list price. Note, as I mentioned above, this gasket may differ depending on which engine you have. Inquire.
I directly encountered one U.S. aftermarket rebuilding kit for the pump, costing $36. Call 1-800-881-4042/1-703-425-5380. I do not know how its contents compare with the Mercedes kit or who makes it. Other vendors assured me they could supply kits. Various European sources offer them. One specialist in all kinds of old fuel pumps indicated he could supply all necessary rebuilding parts for under $25. See: www.then-now.com. A very interesting website is: www.ruddies-berlin.de/index2.htm. On this site (click pumpen, then Mechan) note that the Pierburg 7.10284.5 pump shown appears identical to the DVG pump with the brass vent fittings discussed below. Niemoeller sells kits too, as well as new pumps. See: www.niemoeller.de/englisch
Rebuilding Kit ("long")
Let's call the current Mercedes kit and others comparable to it the "short" kit, for want of a better term. I discovered that Mercedes used to sell a "long" kit, part number 180-586-02-90, to the car trade but no longer does so. This kit is, however, still supplied to the European trade that deals in military vehicle parts. Many UNIMOGs, for example, were fitted with the standard 180.924 engine found in the Type 220S Pontons.
Refer to the parts diagram and kit list above. The "long" kit includes what is in the "short" kit plus:
- 1 of figure 3
- 1 of figure 2
- 1 of figure 4
- 1 of figure 5
- 1 of figure 7
- 1 of figure 8
- 1 of figure 9
- 1 of figure 11
- 3 of figure 14
- 1 of figure 33
- 2 of figure 36
One non-commercial source in the United States offered me this "long" kit for about $100. Niemoeller offers it for € 97.44 (Euros).
The Rebuilding Job
Ray Ilich's piece on rebuilding Ponton fuel pumps is right on target. I need not repeat his comments here.
See: http://www.mbzponton.org/valueadded/maintenance/fuelpmp.htm
The write-up by Håkan Johansson is equally valuable.
Reference www.mb219.com
The following discussion should be read as a companion to these and assumes you read them.
My rebuilding experience occasions a few hints supplementing the excellent points in these articles. It is best to remove the pump and mounting bracket as a unit from the car. The bolts for only the pump are difficult of access. One needs to pack grease into the pump side of the bracket, and this is difficult when mounted on the engine.
Pay close attention to the three tiny washers on the three countersunk screws (figure14 above) that secure the valve seat plate. They are very easily misplaced, and the Mercedes kit does not include them.
Examine the new valves in the kit. They are identical. One side of each is rubberized. The rubberized side faces the seat and does not touch the small spring. The valves thus face in opposite directions.
Sometimes in rebuilding the pump one has difficulty attaching the curved "tang" of the lever (figure 4) to the diaphragm. That happened to me when following the instructions in the service manual. To get around this problem I removed the lever and holder (figure 5) from the pump after driving out the pivot pin (figure 7). I was able to catch the diaphragm with the curved end of the lever and then reinstall the whole lever assembly and pivot. A modicum of dexterity is required.
Note the washers/seals on the outside of the pump: figures 33 and 36 on the diagram. Three of figure 36 and one of figure 33 are used. The kits do not include them. They were originally fiber, presumably to ensure no air leaks. Mercedes no longer supplies these as fiber but does as aluminum. The smaller one, figure 33, is DIN 8 x 12; Mercedes 007-303-008-109. The larger ones, figure 36, are identical DIN 12 x 16; Mercedes 007-603-012-400. 10 I found new fiber ones at a carburetor shop. I struck out at plumbing suppliers and the local Mercedes dealer.
I mention a reinstallation frustration. Before installing the rebuilt pump, I bench tested it. The flow was good, and the priming lever clearly felt resistance and operated the diaphragm. Ready to go, I thought! After installation, the priming lever showed no resistance, and there was no fuel flow. Something must have just failed internally! What bad luck! I removed the pump and found that, when on the bench, the priming lever clearly engaged and worked the diaphragm. Puzzled, I simply reinstalled it. Again the priming lever indicated no engagement, and no fuel was primed. I removed the pump again. On the bench everything engaged properly. Rather than another mindless reinstallation, this time I decided to think through what I was encountering. I fiddled with the push rod and at the same time worked the priming lever. What I concluded was that somehow the drive cam inside the engine had moved such that when the pump was installed, the push rod was depressed into the mounting bracket. That meant the diaphragm was already depressed inside the pump to the point that the priming lever would not operate it. The lever would appear loose and disengaged. I turned the engine via the 27-mm (1/16-in) crankshaft bolt on the front with one hand while feeling with my finger inside the pump hole at the side of the engine. When the cam seemed to reach the low point, I installed the pump again. Voila! The priming lever engaged and primed the system. The push rod apparently was fully extended into the engine this time around. Be mindful of this.
Finally, being hunched into the engine bay at the fuel pump exposes one to vicious attacks by the raised hood upon withdrawal. Those who are less than hirsute of scalp need to pay special attention so as not to accumulate battle scars.
Should Have Done, But Didn't
After completing my rebuild job, I came across some good advice which I pass on here. 11 Place a sheet of emery paper, working side up, on a smooth wood, marble, or glass backing. When the pump is disassembled, put one of the halves face down on the paper. Rub it around lightly. The six screw holes will shine up first. Continue lightly until the entire flat part shines. Repeat on the other half of the pump. This procedure removes uneven spots that may have developed over the years. Leaks are less likely upon reassembly. Fortunately, my pump did not leak even though I did not do this.
"O-ring or No O-ring" — That is the Question!
Note the brass bushing pressed into the mounting bracket (figure 44). The push rod (figure 48) slides through it without any wobble. Note the end insert (figure 45). Peer inside the brass bushing. Look again, from the pump side. Towards the pump side of the bracket there will be what appears to be an internal groove for an O-ring. On my mounting brackets this was the space between the tapered/beveled end of the bushing and the pressed-in sleeve. Neither the groove nor an O-ring is shown in any Ponton parts diagram, and the service manual is silent.
Some Ponton sources suggest that, despite the uniformity of the Ponton picture parts books, on some pump mounting brackets this internal groove did take an O-ring, on others there was a rubber sleeve, and still others required neither. I was not able to verify independently that there were all these variations.I examined two identical mounting brackets very closely. One was from a Type 219 and the other from a Type 220S; part number 180-091-03-45 embossed on both. I used a "probe" fashioned from a paper clip, with a short 90-degree bend at the tip, to explore the groove from both ends of the bore. This revealed that the end of the brass bushing coming to an end about one centimeter inside the pump side of the mounting bracket was, in fact, tapered/beveled, not perpendicular. You cannot see this clearly because of the shadows and the angle of view. The taper/bevel on the end of the brass bushing inside the mounting bracket persuaded me that, on at least the two mounting brackets I examined, no O-ring was intended to be fit. No O-ring would stay in place in a groove with a slanted bottom. A cylindrical sleeve (not figure 45), about five mm long, was pressed into the mounting bracket opposite the brass bushing. One can see its end looking into the open cavity of the mounting bracket. I probed at this sleeve with a proper pick quite awhile before determining that it was metal, not hardened rubber. Still, there had to be a reason why the whole thing was constructed as it was. I finally backed into the conclusion that the groove was designed to fill up with oil and provide lubrication to the constantly reciprocating push rod. 12
I take pains to recognize that others report different construction. Joe Alexander points out that the groove takes a very small O-ring that is not depicted in the parts diagram and is not on any spare parts list. 13 The O-ring fits into the groove discussed above. That means on some cars the brass bushing must not have a tapered/beveled end but rather a perpendicular one. (I have to wonder, nevertheless, if any O-ring would be engineered to stand up to years of reciprocating motion.) If this O-ring has lost integrity, it will permit engine oil into the mounting bracket where it will dissolve the grease and eventually reach the underside of the pump diaphragm, contaminating it. If you have this O-ring and you are sure it was an original fitment, it would be wise to renew it with a viton type.
Håkan Johansson wrote, instead, of a "rubber sleeve" in the mounting bracket on his Type 219 Ponton. Here is the service manual's depiction of the pump, as provided by Håkan:
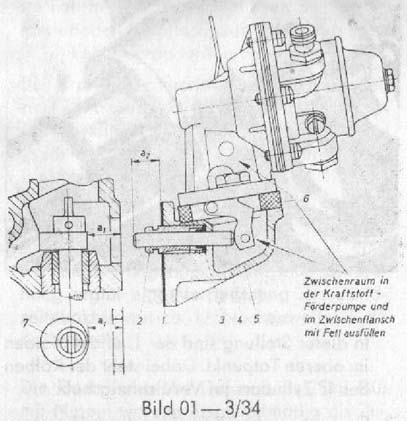
This depiction also shows the external groove in the brass bushing on the engine side (just to the right of where the 2 points). That groove, on my two mounting brackets and shown (figure 44) on the parts diagram, is for fitting a removing tool to extract the bushing from the mounting bracket. There is seldom need to remove this although Håkan did.
The sleeve Håkan discusses, where the 3 points in the depiction above, is the same has as figure 45 on the picture parts diagram. The sleeve's current Mercedes number is 180-091-00-91. 14 I found nothing like that on my mounting brackets, so I bought a new one. I have not figured out how it relates functionally to the short, cylindrical metal sleeve I found pressed into the bore of the mounting brackets from the pump side except to say that they do not interfere with each other. I concluded that these cylindrical metal sleeves, found identical in both my mounting brackets and also identical in bore diameter to the brass bushing, are not simply remnants of the sleeve Håkan discusses. This is because they were metal and evenly fitted; and the ends were machined and not jagged as would be the case from a break. Also, I found no debris in the cavity of the mounting bracket or other signs of detrition. I did not have at hand a new mounting bracket to examine to determine if these sleeves came prefitted. I have to think that they do.
The new sleeve I obtained (to where the 3 points in Håkan's depiction and figure 45 in the parts diagram) is either plastic or a very hard rubber. It fits perfectly. Its small end butts up exactly against the cylindrical sleeve I found and discussed above. The wide end fits snugly against the mouth of the bore inside the cavity of the mounting bracket. It is obviously an oil seal to prevent engine oil from reaching the cavity and/or a grease seal to prevent grease from migrating into the bore.
What Does the Pump Look Like?
At least two DVG pumps were fitted beginning with the Type 170S, maybe more. 15 They were interchangeable, and their operating innards were the same. The numbering found on the edge of each pump once had a meaning, but I have not discovered what it was. 16 These were slight differences, not as to vehicle application, but from year to year.One DVG pump variation had two brass "protuberances" on the bottom half of the pump with no vent hole. 17 The following picture shows one; the other is hidden opposite.
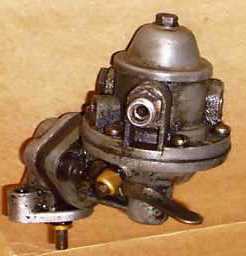
These are vents. Disassemble them and one finds a vent fitting covered by a fine mesh screen, obviously to filter air drawn in when the pump was operating. Both vents serve the same chamber, so it is unclear to me why two were fitted.
The 190 service manual at 01-4/24 identifies the pump with the brass filter covers as Mercedes number 000-091-53-01. It was supplied to vehicles destined for dusty terrains.
The other DVG pump lacked the protuberances and had one small vent hole. The primary purpose was the same.18
One pump with the brass vent fittings I have seen came from a 1958 Type 219 sedan. My 220S, produced in September, 1959, originally had the pump with the vent hole, not the protuberances. One pump on a Type 220a sedan was reported as lacking the brass vents and having the hole, but who knows if this pump was the one originally fitted?
Which Vehicles?
Mercedes fitted these pumps with the priming lever to the carbureted Ponton, UNIMOG, and pre-Ponton vehicles of the period.Following is a table of applications by engine series.
Mercedes-Benz Application by Engine Series
Engine M121 Engine M136 Engine M180 121.920 136.922 180.920 121.921 136.925 180.921 121.922 136.926 180.924 121.923 180.940 121.926 180.941 121.927 121.928 Note: Mercedes documentation I have seen indicates that the lever-type priming pump was installed up to the indicated engine serial number in the following engine series:
- M121.926 up to engine 0 01019
- M180.940 up to engine 0 046694
- M180.940 up to engine 2 00801
- M180.941 up to engine 0 099653
- M180.941 up to engine 2 005228
I do not understand how there were two different engine serial number sequences within the same engine series as seen for 180.940 and 180.941. (If someone can explain this, I shall be happy to make a revision).
If your vehicle originally had one of the above engines, so too it came with the DVG pump with the priming lever, subject to the caveat in the paragraph above. What varied among some of the engine applications was the mounting bracket between the pump itself and the side of the engine. This entailed different gaskets abutting the engine.
Put another way, these pumps were originally fitted to at least the following carbureted Mercedes-Benz vehicle Types: 170S, 170Sb, 170S-V, 180, 180a, 180b, 180c, 190, 190b, 190SL, 219, 220, 220a, 220S, UNIMOG, 404, L319, O319, and 319B. 19
Finally, note that these pumps have two ports blanked by bolts. This suggests that these pumps may have had wider application than the Mercedes vehicles indicated above. Alternatively, these ports may have pertained to some of the above Mercedes models; that is, different ports for different models.
Conclusion
Modern RFG evaporates much more quickly than previous, non-RFG. Design constraints in the 1950s compelled Mercedes to fit priming fuel pumps originally. Operating elements of the fuel delivery system on our Pontons have doubtless worn and/or aged. My car currently lacked a priming fuel pump. Thus several things conspired to create the hard-starting difficulties. The first step I could take to address these complementing problems was to resume using an original-type priming pump.So, Did it Actually Work?
My car had been sitting unused nearly three months. I primed the fuel system with the newly installed pump. I pulled the choke. I pressed the starter button. Nothing happened. The battery had died. I charged the battery. Then I gave the pump lever a couple of strokes. The engine fired immediately and ran well. Now I am ambivalent about overhauling the carburetor. An electric fuel pump is not in the cards.Still to Learn
Yet to be determined is the optimum number of strokes with the priming lever. Will there be a relationship between the number of strokes required and how long the engine has been sitting cold (e.g., X strokes after two days, Y strokes after a week, and Z strokes after two weeks)? I shall be happy to modify this section based on experiences reported to me. One can visualize, as an extreme scenario, a combination of too many strokes, combined with a defective or stuck carburetor float valve, pumping enough gasoline into a cylinder approaching top dead center (TDC) on its compression stroke to cause a hydrostatic lock when the engine is cranked. Talk about ruining one’s day!Solicitation
Comments, additions, and corrections are welcome. Please send to: douglas.broome@verizon.net
Appreciation
Thanks to the following members of the International Ponton Owners Group (IPOG) for providing very helpful "peer review" of a draft of this article: Scott Gordon, Henry Magno, Joseph Alexander, Håkan Johansson, Len Sokoloff. Their suggestions were invaluable. Special thanks to the www.mbzponton.org editor, Jeff Miller, who labored mightily to convert my original article from a word-processing program to a web-readable piece. This requires much more work than anyone realizes and is doubtless a labor of love. Responsibility for errors of omission or commission is mine alone.
Disclaimer
The usual disclaimers apply. The above information is provided as a courtesy only. Accuracy is not guaranteed. Proceed at one's own risk in using any of it.Footnotes
1 L. Conrad (Dave) Davis, of Forest Hill, Maryland. With permission.
2 After WWII until 1965 Mercedes fitted only Solex carburetors to its product line.
3 The earlier 170V did not use this priming pump. Its carburetor was fed fuel by gravity. Note, additionally, that the 170S changed to a downdraft carburetor from the 170V's updraft carburetor. These same priming pumps continued through the 170Sb and 170S-V models and then throughout the Ponton model series.
4 For additional discussion, see Skinned Knuckles, January 2002, pp 37.
5 "Dave" Davis again. With permission.
6 Skinned Knuckles, April 2000, pp 22 contains a readable, detailed discussion of the electric fuel pump alternatives.
7 Before World War II, DVG acquired rights to manufacture Solex, Stromberg, and Zenith carburetors
in Germany. Some years ago the DVG enterprise went to Pierburg. The complicated, overlapping
ownership of European manufacturers can be mind-boggling. For example, both Pierburg and DVG
are/were located in Neuss. For an edifying discussion of this ownership tangle, see the late Frank King's
article in "Star Reprints" No. 2 pp 25.8 For those who are interested, this is, notably, the situation with the suppliers of carburetor rebuilding kits
for our Pontons and most other cars, including, but not limited to, the Royze kits.9 Why were they soldered together originally? I puzzled over this. I concluded that they were originally
connected so as to prevent the spring's falling out and down out of sight when one opened the cover to
clean debris from the screen when the pump was installed. Also, with the spring attached it was easier to
remove the screen for cleaning while the pump was mounted to the engine. Take your pick.10 These are not standard Mercedes part numbers but nevertheless are the ones used.
11 Håkan Johansson also stresses this point.
12 One report I received from an owner of an old American AC-style pump was that the push rod sometimes got stuck inside the bushing for want of lubrication.
13 Thanks to Joe Alexander for alerting me about this. I had no idea.
14 Thanks to Håkan Johansson for clarity about this.
15 One speculates whether DVG subcontracted the manufacture of these pumps which resulted in slightly different designs. I have no information.
16 Comparable numbers found on old American pumps have clear meanings, allowing precise identification of variants and particular applications.
17 Thanks to Bruce Bristow for the picture and the 219's pump for me to examine.
18 When the diaphragms on these pumps fail, fuel enters the lower chamber where these air holes are located. Fuel comes out these vent holes then, and that indicates diaphragm failure. I conclude that the primary function of the vent holes is to let air into the pump to equalize the air pressure behind the diaphragm. An ancillary function is to let fuel escape when the diaphragm ruptures. This reduces the possibility that fuel could eventually enter the engine and foul the oil.
19 This list omits mention of the 1960s "Fintails" (Type W110, W111, W112), yet the priming pump was fitted on some of the early Fintails. Thanks to Bob Gunthorp we learn that the same priming fuel pump was fitted to the 220b at least until 1963. The original priming pump Mercedes number, 000-091-53-01, carried over from Type 170S through the Pontons to these early Fintails. He notes further that in 1965 the Type 220Sb no longer came with the priming fuel pump. He suggests, and I am compelled to agree, that the priming fuel pump was discontinued when Fintail carburetors changed from Solex to Zenith around 1965. See footnote 2, above. To the extent this holds true among the various carbureted Fintails, it confirms the theory that Mercedes new all along that the Solex carburetors had an intrinsic fuel-evaporation characteristic requiring the use of a priming fuel pump. Finally, note that the carbureted Type 300 "Adenauers" were fitted with a priming fuel pump, but it was different from the one for the Pontons, and they and their internal parts are not interchangeable with the Ponton pumps.
Created March 17, 2003 / Jeff Miller
© www.mbzponton.org
Return to the Ponton Workshop page