Figure 1.
by Len Sokoloff / len@sokoloff.com / 1959 220S cabriolet
For me, it was time when I noticed a small leak at the booster causing a slight wetness on the lower half of the booster and the shelf that the booster sits on. This leak was very slow, causing the brake fluid in the reservoir to drop very slightly. Fortunately or unfortunately, depending on how you look at it, I also had planned to clean up some rust on that shelf and repaint it and I also had new heater pipes to install, so multiple jobs in that area made me rationalize the fact that, "Hey, I am going to take it out anyway, so I may as well rebuild it." Some of you may decide that after 40 years, it just needs to be done for peace of mind.
ABSOLUTELY, if you have the booster that is held together by the J hooks (Figure 1: #20). The official name of the J hooks is "tightening screw." I got in contact with Will Samples from S & S Imports in Dallas. HE IS ABSOLUTELY FANTASTIC AND I WOULD RECOMMEND HIM HIGHLY!!! Will rebuilds these things for a living, but he also sells rebuild kits for $250 and will send along the official ATE Power Brake T50 manual to help you through the rebuild. Will is also available to answer your questions as you go through the process.
Will Samples
S & S Imports / Dallas, Texas
Telephone: 214-826-5977
FAX: 214-826-5294
ssimports@sbcglobal.net
Contact information valid as of January 19, 2010
Prices valid as of October 30, 2001
Will always answered my FAXes within a couple of hours. BTW, Will can rebuild it for you for between $410 and $550 depending on whether you need 1 or 2 stainless steel sleeves installed inside the booster. Turn around time for Will to build it can be a week. If you do it yourself, it will take a weekend.
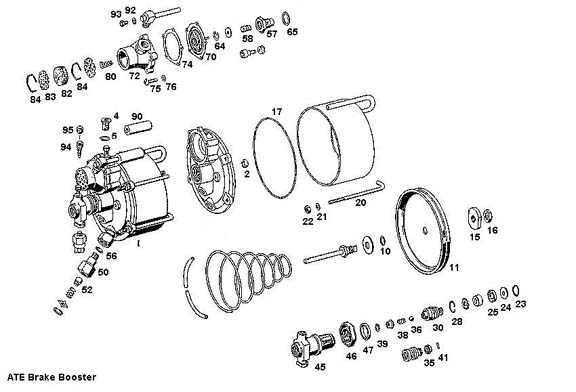
Figure 1.
What comes in the rebuild kit? Well, certainly not $250 worth of parts, but we have gone down that road before with parts for our old cars. Most of the rubber parts are included. Referring to Figure 1, the following parts are included: #2, 5, 10, 17, 23, 25, 35, 36, 47, 65, 70, 74, 82, 92, and the two rubber cups that go on #58. As an aside from Will, he did indicate that parts suppliers are dwindling and he does not know if he will be out of parts on 6 months or 6 years, so you might want to think about whether you want to get a rebuild kit just to have for future use.
Items 45 and 57 may need to get sleeved if they are pitted badly. They are cylinders and have rubber cups in them, just like a wheel cylinder or a master cylinder. Will Samples has them on an exchange basis or you can have them sleeved by your favorite machinist. The ones from Will are stainless. You should do NOT use brass sleeves. The brass oxidizes and develops a thick gummy paste and then things get stuck.
Since all the instructions come in the manual, I will just throw in a few tips that Will passed on to me:
Take the whole thing apart - you may find dirt and pitting in the darndest places. The only special tool I need was a 30mm socket to get #57 out. A vise will help to break free any stubborn bolts. You will also need some decent snap ring pliers.
Look inside #72 and make sure the rubber ring that contacts #70 is in good shape, no dents, chips etc. If damaged, glue a new thin piece of rubber to it. On the opposite side where spring #80 goes, blow into this to make sure it holds air.
Use castor oil for lubricating rubber parts when you reassemble, not the brake fluid that the manual suggests.
Make sure #57 and #58 hold pressure. Hold your finger on the side of #57 and push #58 against the captured air pocket. #58 should depress and then pop back to its original position.
The shaft that is not numbered has to be polished to a mirror finish using dry 1500 grit wet/dry sandpaper.
Where fitting #4 screws in, look down the hole and you will see a small passageway. This leads to a pin hole that comes out where #45 terminates. Use a spray can of carburetor cleaner with the little red spray tube attached and spray into the passageway until you see the stream of spray coming out inside where #45 screws in.
Any pitting/rust in the big tin can needs to be taken care of or you will experience a vacuum leak. Coat any pitted areas with epoxy and sand to perfection. Just prior to reassembly, you need to re-lube that tin can and plunger #11 with white grease, i.e. Teflon, silicon or brake assembly paste.
Certainly, there will be questions that are unique to your situation. That is when it is great to have someone like Will Samples available to answer them for you.
The brake booster rebuild job is definitely one that you can do yourself, not only to save some money, but also to learn more about how the thing works and to get the satisfaction of knowing you did it yourself.